Saturday, June 29, 2013

Have A Very Merry Christmas in almost July...

 Here with a little Victorian Country Christmas spirit in almost July.  For the first time ever I am trying to make Christmas cards all year around so that I will have less to do come December and can relax and enjoy family and friends more during the season.  To this end I have a card this week for the Festive Friday Challenge #11.  It is an element challenge and here is the inspiration photo:

I have a ton of ideas for using tree elements bouncing around in my head tonight.   But I have to say that this card took me a while to pull together as several of my ideas did not pan out (yet!). Needless to say my spare parts box has lots of extra diecuts tonight for future Christmas cards! LOL!  The one thing that did work perfectly was the gorgeous sentiment from Verve that I wanted to use:

I finally settled on using a pine cone stamp and 3 small Magnolia tree diecuts in cardboard and cardstock for my tree elements.  Here is a close-up:
The heart dies are from both Cheery Lynn Designs and PTI.  The ribbon is from Really Reasonable Ribbon.

Thanks for taking a look at my card!
Happy Weekend!
Jill

Thursday, June 27, 2013

For Your New Nest....


Hello again,
It is once again raining in Seattle....though nice weather is supposedly on its way for Friday and next week....it may even hit 80 degrees which is warm for Seattle.  I will be excited if it really is sunny and will definitely be outdoors to enjoy it with my little one.

Because of the rain we are inside this afternoon and I decided to play with a new Paper Sweeties stamp set that I recently won via a challenge.  It is called "Sending Springtime".  A big thank you to Debbie of Paper Sweeties for the prize!  I love my new stamps!  I am linking this up to The Shabby Tea Room Week #172 - Summer Breeze Challenge once again.  Here is the inspiration photo:

This week Starr is our creative host and she has chosen the theme of 'Summer Breeze' along with this beautiful photo for inspiration and Starr asks that we create a card or project inspired by the COLORS IN THE PHOTO AND ADD A FABRIC ELEMENT!


My fabric element is the lace piece at the top of the card.  This photo also gives you  a little peek at the inside of the card....I stamped the birdhouse in pink and added a white scalloped mat.  I made this card to have on hand for when new neighbors move into our neighborhood.  I love the sentiment!

Thanks for taking a look at my card.

If you are interested I am also going to share some photos of my house/garden on this post for a friend who wanted to see some photos of the clematis etc. that I grow in my yard.  Please feel free to skip to the end if you want. :)

I live in a 1920's charmer that I bought when it was practically falling down while I was still single and in my early 30's.  The house is very similar to the one that my Grandparents owned and means the world to me.

There was nothing here but dandelions when I bought it and EVERYTHING needed to be fixed inside and out!!!  The day that I painted the front of the house at least 20 people stopped by to thank me for buying it and fixing it up as apparently it had been the "eyesore" of the neighborhood for many, many years.  I have learned a lot since I purchased it 16 years ago and when I married my sweet Stuart in the year 2000 he moved from his property to mine and joined me in working on it. 

If you asked me what my favorite hobbies are I would say gardening and paper crafting, with hiking in the mountains as a close third - especially if it involves a waterfall of which there are MANY in Washington State.  I spend time in my garden everyday even if it is just for a few minutes and the kids in the neighborhood are in and out of my house all day long in the summer and throughout the year which means the chairs in the front and back yards get a lot of use!  So fun to have lovely neighbors!      

 The picture below is the front of my little saltbox house...and the garden that I have cultivated over the years...it is all perennials and comes back each year with no help from me!  I love that!!!  This photo was taken in May before some of the roses bloomed but it shows the clematis vines in bloom:
This is a Nelly Moser Clematis - one of my favorites!  I don't have a close-up of the other one and cannot remember the name of it either! :)
Here is the view as you walk into our backyard....


I added these sap buckets to the fence about 8 years ago and plant annuals in them each year.  This photo was taken just after filling them this year and the flowers inside of them are now at least 3x this size and trail down the fence beautifully! 


Another clematis....

One of my newer "Knock-out" roses...they bloom and bloom and bloom and need little maintenance unlike the majority of my hybrid teas which were not in bloom yet when I took this photo.


Love this rose - it was a gift from a friend when I bought my house.  I  would have to look at the tag to tell you its name though.  I love that it is usually one of the first to bloom each year!

One of my many shade tolerant perennials...these flowers open up in the morning and fall off in the evening and new ones bloom the next day.  Isn't God miraculous in his creations!

Well that is it for this post....I didn't want to post too many photos though I have more LOL!  If you are still here - thanks for bearing with me on this long and picture-filled post!  And if you are curious if I grow any food - yes I do....blueberries and raspberries and a few veggies and herbs too.
Hugs,
:) Jill


Monday, June 24, 2013

You are the most wonderful little SISTER!


Hello Friends,
Happy Monday night to you all!  I am here with a card set for The Shabby Tea Room: Week #172 "Summer Breeze".   Here is the lovely inspiration photo:

This week Starr is our creative host and she has chosen the theme of 'Summer Breeze' along with this beautiful photo for inspiration and Starr asks that we create a card or project inspired by the COLORS IN THE PHOTO AND ADD A FABRIC ELEMENT!

I love this photo!  And I would love to have that light aqua blue quilt in the bottom of the photo for my bedroom!  So pretty!!!!  My cards were inspired by all of these sweet and soft colors and the roses laying on the top of the pile!

 I started this card with Paper Sweeties "You are the most wonderful" stamp set.  I added the word "little" from a Papertrey Ink baby set.  I love this paper sweeties stamp set!  I am hoping that Debbie will add additional words to a 2nd set in the future....like niece, nephew, cousin, baby, teacher, doctor, nurse, etc. and maybe another sentiment like "Happy Birthday to the most wonderful...". I sure love the fonts in this set!!!!  For this card which will be given to one of my 4 sisters I used some digital papers and some oval diecuts.  I added some felt roses and lace as my "fabric" elements.  And I embellished the oval with some background cloud stamping (Unity Stamp Company) and some dimensional paint dots in a light pink.  I added the light blue color in the photo into the bottom half of my oval diecut with a digital paper and a sno-cone button.  LOVE  that light aqua color! 

This cupcake card is for a very dear cousin who celebrates her birthday today!  Happy Birthday Stacey!!! 
I love the soft roses and peaches of this card....I added embossed vellum over the top of the patterned digital paper to lighten it somewhat.


On a personal note:

Yesterday would have been my dear husband's 56th birthday.  It is the second birthday that Tim and I have celebrated without him.  Last year I decided that I would take a picture of Tim and I together on each of Stuart's birthday's to keep as a special keepsake for Tim as he grows up.  I hope to add some words about his Dad into the book for him as I know he will have lots of questions about who his Papa Stuart was as he grows up and becomes a man. 

Here is this year's photo of us:


And a few goofy candids....


We took the pictures before going to place flowers at Stuart's grave site.  The roses are from our garden and we decorated the jar with Happy Birthday sentiments and wrote little notes to Papa Stu too.  God surely placed peace in our hearts that day and we felt joy for the many blessings we have in our lives even as we miss our Stuart so very much.   

A friend sent me this poem to commemorate Stuart's special day. Many of us have loved ones that we miss on their birthdays so I thought I would share it....


 Thanks for reading my little blog and looking at the cards that I make.  My spirit is fed by all of the beauty I see on your blogs and in the world around me.  Life truly is a blessing...even with the heartaches that we all experience!
Hugs,
Jill

Thursday, June 20, 2013

A rainy Seattle day means lots of creative time for me!! Yeah!!!


Hello Crafty Friends,
I have two creations to share with you today as it is raining here in Seattle and that means lots of indoors time to create, create, create!!!  Lots of pictures in this post so I hope you have a nice cup of ice tea or coffee to get you through it! :)

My first creation I have been working on little by little over the past three days.  It is for the new "A Mixed Media Color Challenge" and is my first attempt at doing anything in the mixed media realm.

I was totally inspired by Mona and Sue's beautiful creations and have been slowly gathering some supplies in order to be able to include mixed media in my crafty projects.  For my first project I used Picket Fence Distress Crackle Paint and Shimmerz Dazzelerz Tutti Frutti Dimensional Paint.  I made a square card base from True Black cardstock and the first night I just painted the two corners of the card base with some of the picket fence paint.  The next day I added the Shimmerz dimensional paint and then let that dry.  This paint is more like a very soft fiber paste with shimmer and dazzle added to it.  The company describes this product as a textural paste type paint. It is so pretty in person and my pictures do not do it justice!!!!

Here is a picture of what the card base looked like at that point:


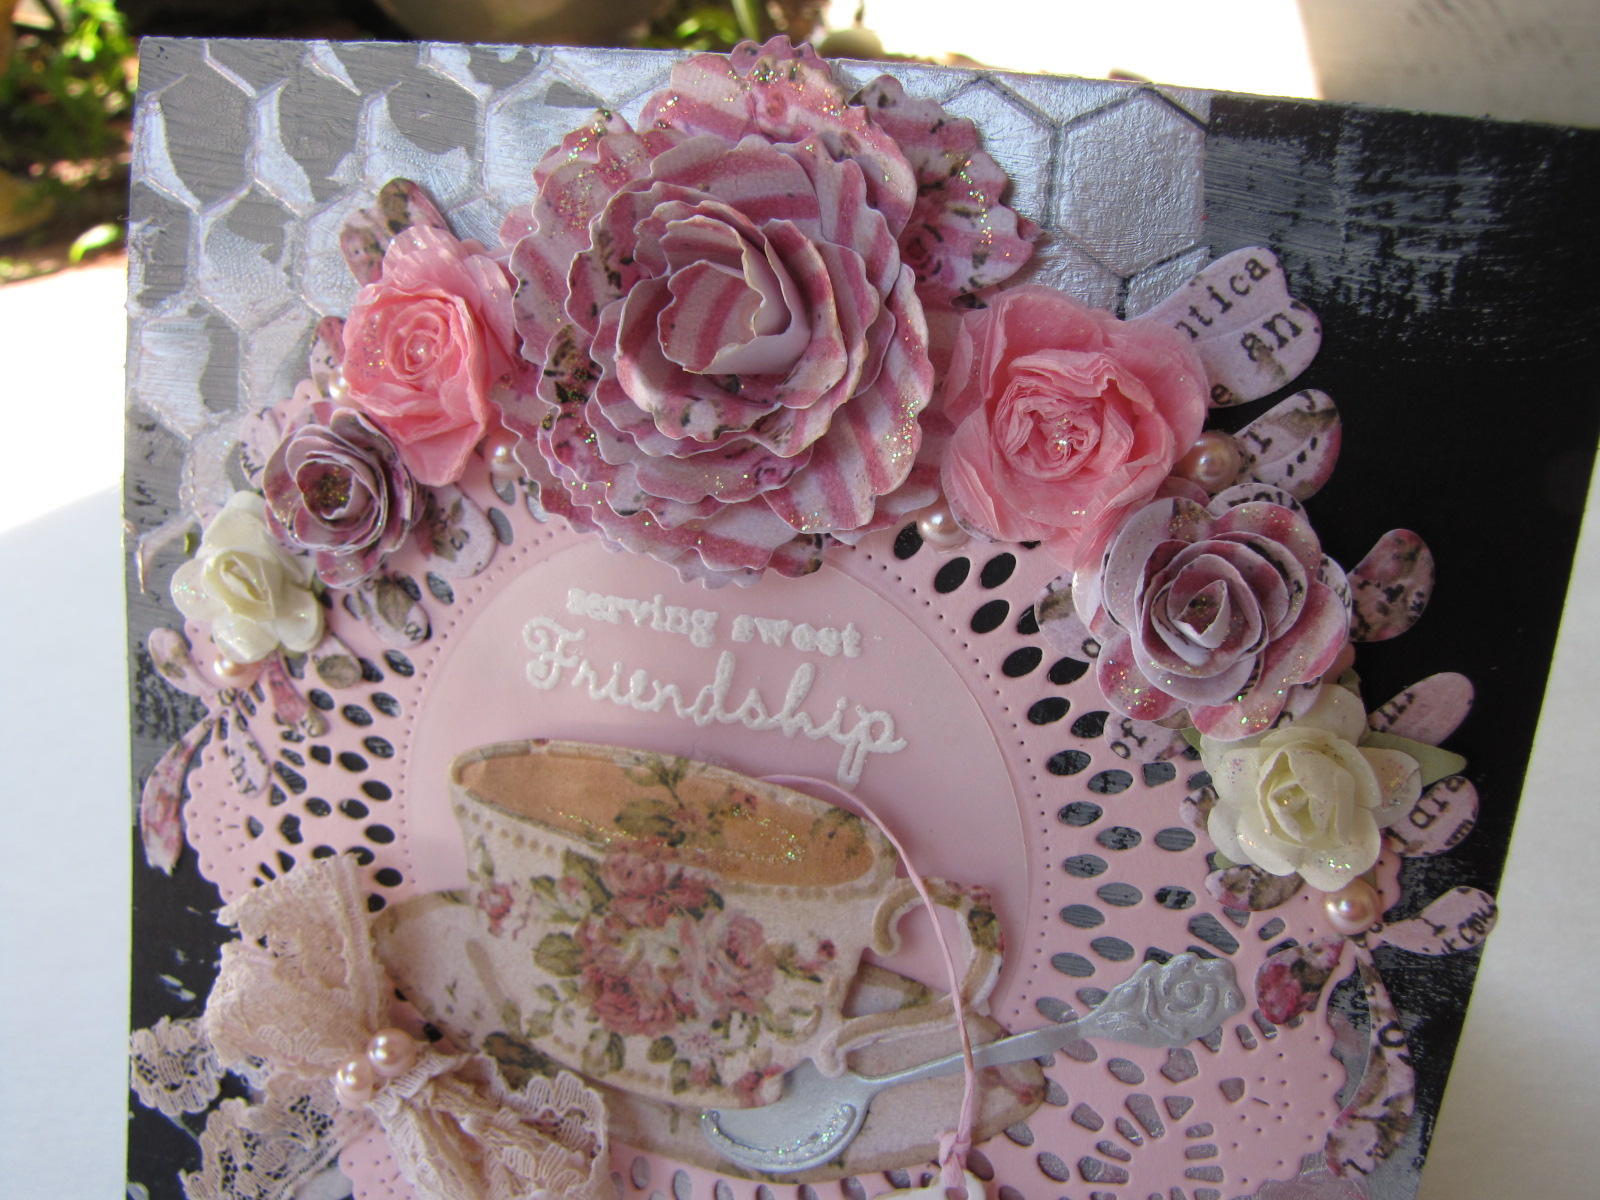
 Today I completed the card.   
Edited to add updated pictures of card with some changes:  I added some pink pearls to the card. One as the center of the largest flower and several clustered around the bow and among the smaller flowers.


 After taking the picture above I decided to add a little more shading with my copics to the tea cup and saucer as I felt they did not have enough dimension.  This is a close-up after the shading was added:


Don't you just love that little teaspoon?  The cup, saucer, and spoon are from a new to me die set CR1237 from Marianne Craftables if you are interested.  The "Serving Sweet Friendship" sentiment is from a Greeting Farm stamp set.  "Friend Blend" is from Papertrey Ink.

I also made most of the flowers on this card using various rolled flower dies.  I made the two solid pink flowers out of crepe paper that comes on a roll and is used to decorate for birthday parties.  They have it at most "dollar" stores or party supply stores.   I will be doing this way more often as I really like how they turned out!  Here is a picture of how I did it:
I layered about 4 strips of pink crepe paper under my die and ran it through.  Then I used a paintbrush end to shape the die cut flowers and I rolled them.  After they are rolled you can separate the layers out for a fuller flower.  I left mine less separated so that they would match the other flowers I had made.


My second card is for this week's The Shabby Tea Room challenge: week #171.  This week Rebekah is our creative host and she has chosen the theme of 'Ruffles and Ribbons' along with this 
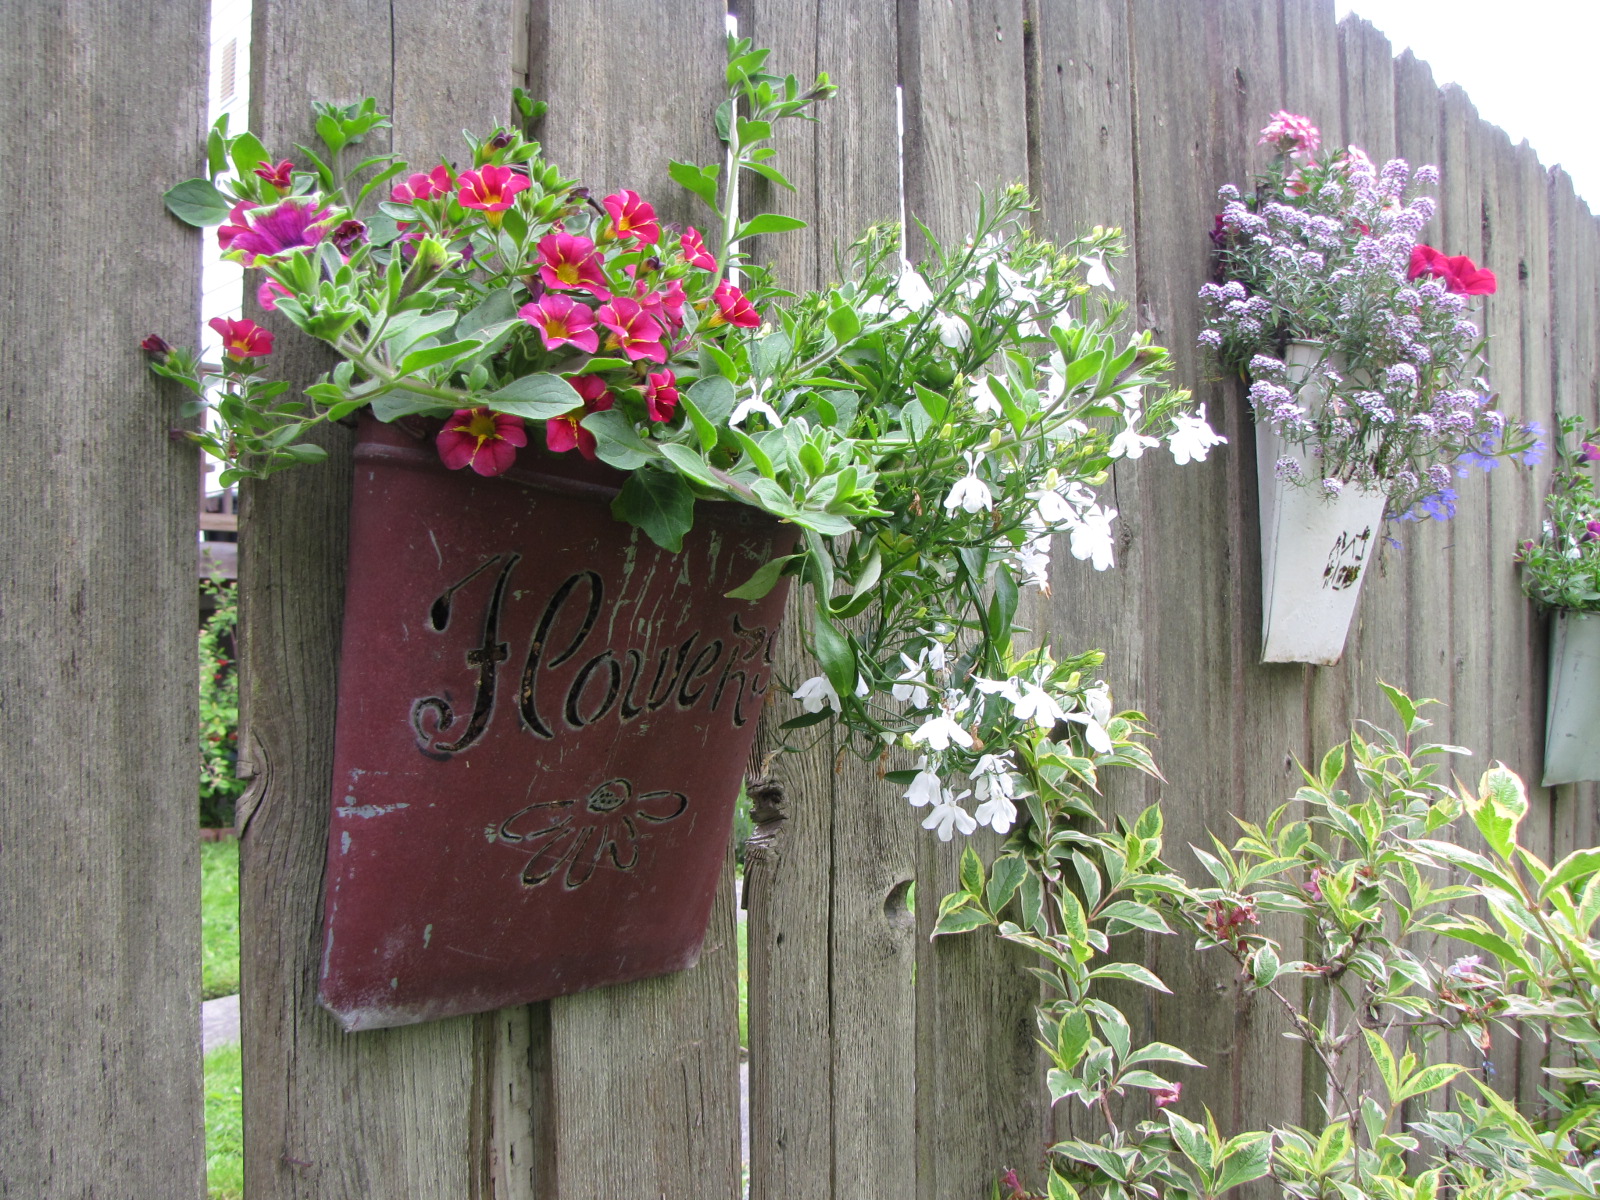
beautiful photo for inspiration:

 Rebekah asks that you create a card or project inspired by our beautiful inspiration photo USING PINK, GREEN, RUFFLES and RIBBONS!

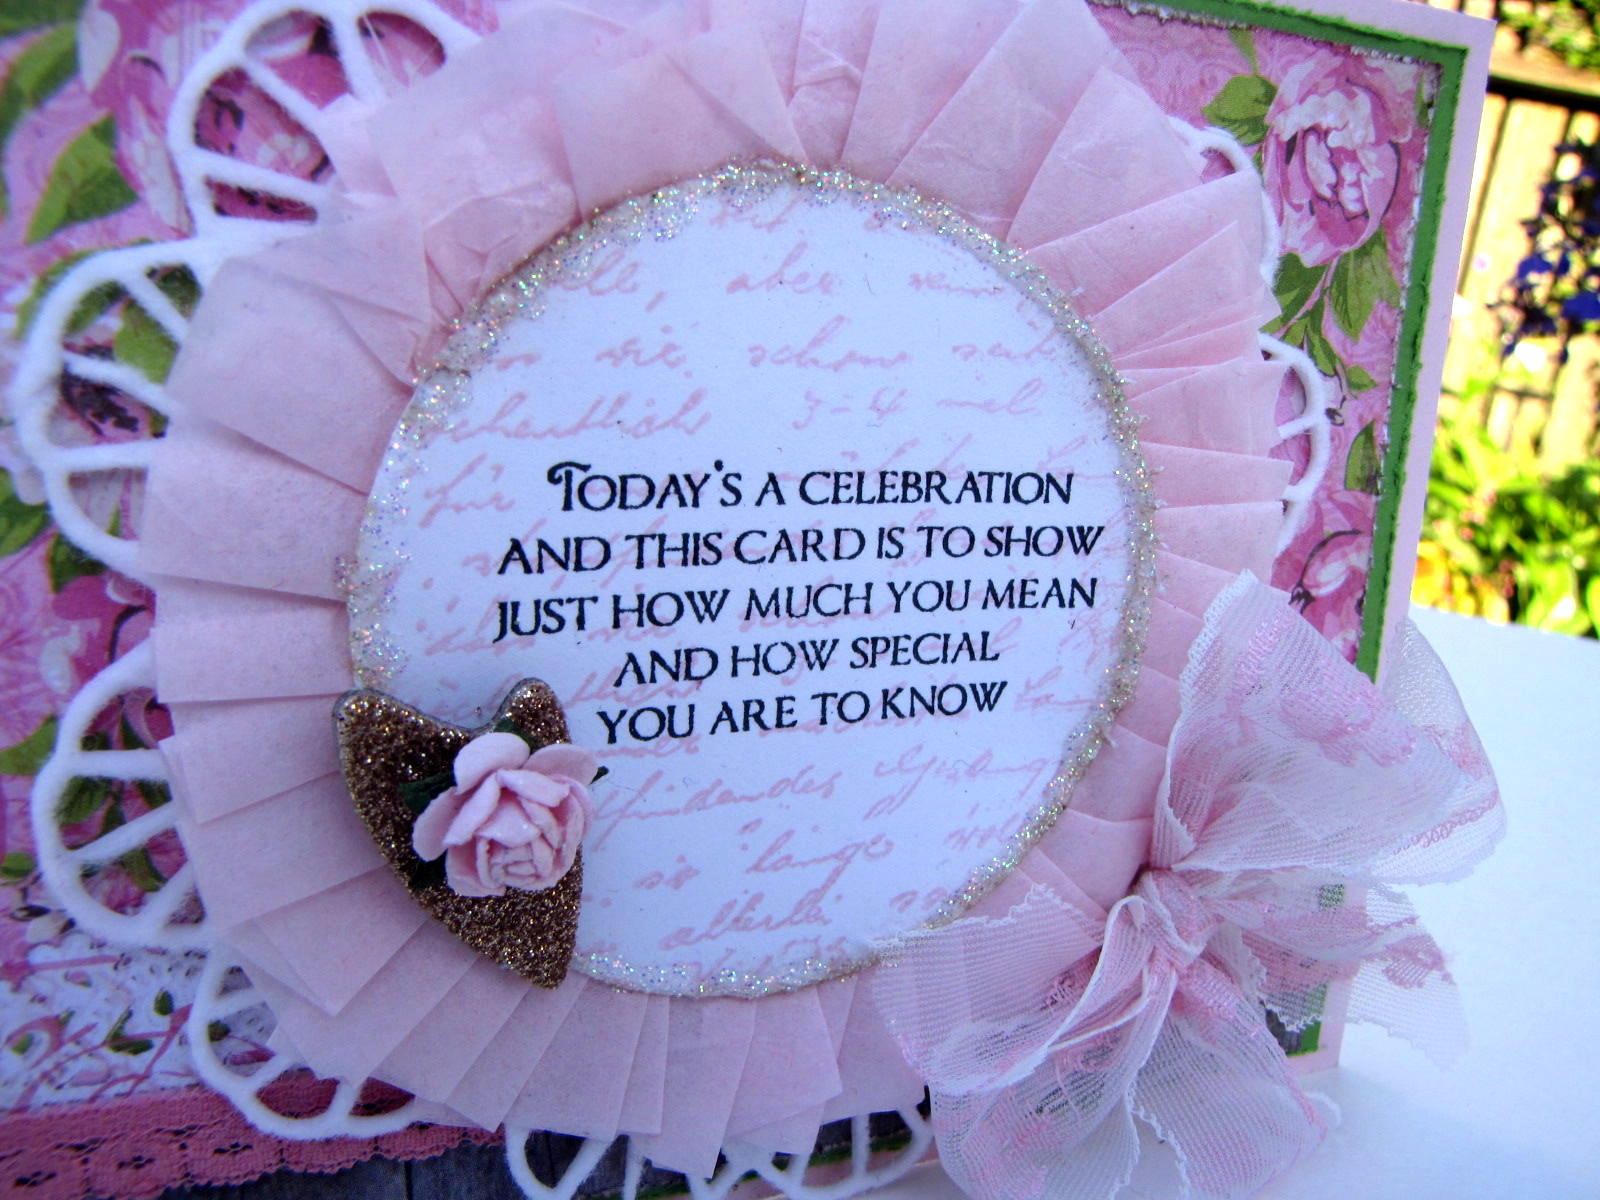
Here is what I came up with:

 I made the medallion in the center with a die from Memory Box and a rolled rose from MFT.  The stamp set is from Paper Sweeites and is called "Life is Beautiful".  The green rose paper is from Iralamijashop on Etsy and is called "Shabby Flowers Collage". 

I felt the top of the card needed balance so I added that butterfly.  The heart that decorates the pot is made from fabric and the woman who is blooming where she is planted under the sign is from a border die from MFT stamps. I thought she added a sweet touch to this card that is destined for a girl friend of mine.

Thanks for looking at my cards!!!!  I hope you will try both of these challenges this week.  The mixed media challenge really forced me to try things that I am unfamiliar with.....I watched lots of You Tube videos and pinned ideas on Pinterest to get ready.  Try mixed media just for fun -I think you will like it!  And the Tea Room is always a pleasure!
Hugs,
Jill

Paying the love forward....the Liebster Blog Award....


I received a sweet email comment from Mackie at Mackie Made Paper Creations this past weekend.  She asked me to pay her blog a visit and when I did I found this:
Some "BLOG" love in the form of the Liebster Award.  You can see Mackie's post:  HERE.
Thanks Mackie for nominating me for this blog award!
You are so kind to think of me!!


To accept the award, you need to thank the person who gave it to you and link back to their blog.  Post the award on your blog.  Give the award to five other bloggers who have less than 200 followers.  Write a comment on their blog to let them know they have been nominated. 

Here are the five fabulous ladies I would like to honor with this award.


Amy Papale  - Sugar Bucket Ink

Jacquie Southas - What did I do today?

I love visiting each one of these women's blogs so much!   They each make wonderful cards and projects and always inspire me!  Thanks ladies!!! 

  I truly love to spend some of my free time each week hopping around blog-land to see what everyone is making as each one of us has such a wonderful creative spirit to share with the world!  I hope you will take some time to visit each of their blogs for some truly wonderful inspiration!

Thanks again to Mackie for nominating me!  I hope you will go and check her blog out too!
Crafty Hugs, 
:) Jill

Friday, June 14, 2013

Happy Birthday to YOU! - The Shabby Tea Room week #170

Edited to add:  6-16-13:  I am so excited that my card was chosen as one of The Shabby Tea Room's Terrific Top Three's this week!!!  Thanks so much!  Father's Day was a hard day for my son and I without my dear departed husband and this made me smile tonight! :)

Hello all,
Here with my card for this week's Shabby Tea Room inspiration:

We have been asked to use:  Blue, Pink, White (or cream) and flowers.  I had a lot of fun with this one and made a cupcake card.  I was totally inspired by the photo and by everyone's lovely creations in the tea room!  Each week is just full of eye candy that warms my heart! :)

 This card is making me wish I had a cupcake to eat!!!  LOL!


Below is a close up of the top of the cupcake...I used a digital paper to make the doily and roses and I embossed the pink card stock that the doily is sitting on.  There is a nice bling in the center of the largest rose but you cannot really see it in the pictures.  Perhaps I should have used a cream pearl - it might have shown up better in the photos...I may have to switch it before I give this card away to my Mom for her birthday in August!


A couple tiny tags, some 1/8" silk ribbon and a rose embellishment from Hobby Lobby dress up the sentiment area:


 I decided to take a photo against an Aqua Mist background so you can see the fabric lace flowers sticking out from the top of the card.   I got the idea to make these "lace" flowers from Melissa Phillip's blog "Lilybean's Paperie.  An example of hers that I love is HERE.  I diecut these lace flowers with my tattered florals Sissix die from Tim Holtz.  Love how easy it is to cut fabric with these!:
Thanks so much for looking at my card!  I have been in quite the pastel and homespun mood of late!
:) Jill

Happy Father's Day

Here with a quick post of a card for my Dad for Father's Day:


And I have been doing some painting of some storage items from my craft room.  I am trying to lighten up a lot of my dark brown storage items.  I craft in a dark basement and like to have everything painted in white or light colors as it makes my space brighter and I find it easier to see what is stored inside of them...

Here is what a couple of the items looked like before being painted:  they are dark brown and black:
And now a very, very light shabby pink....almost white.  You also get a peek at my backyard patio area which needs some work. The little built-in bench has some rotting boards this year that I have pulled out but not replaced yet.  It is times like this when I really miss my sweet husband!  But we women can do anything and I am sure I will get these taken care of this summer! I am becoming quite handy with a hammer, saw, and nails!!! Not to mention screws and my husbands drill which weighs a TON!!!  LOL! 

 I can't wait until everything is dry and I can put my craft things away again.  My craft room is all topsy-turvy today! 

So excited that it is the last day of school....my little one gets out of school in less than an hour now! Summer is finally here for us!!!
Hugs,
:) Jill


Monday, June 10, 2013

Like a RAINBOW you COLOR my WORLD!


Hello,
I made a second quick card tonight.  This one uses the colors for The Play Date Café - challenge #185.

Here is the graphic:


And also incorporates this week's Make it Monday #120 - Overlapping Ombre. 
Thanks for taking a look at my card!
:) Jill

Supplies: 
Stamps: Love Lives Here, and Beautiful Butterflies - PTI
Cardstock: PTI and MFT
Inks: various colors Martha Stewart and PTI
Other: stickles - Diamond, stardust pen, teal marker


Happy, Happy, Happy Retirement....overlapping ombre


Here with a quick card for Make it Monday #120 - Overlapping Ombre.  I am still making some retirement cards  for people to give to a special lady that is retiring at our school this week.  I decided to use this weeks technique for today's card.

You will notice that my "Happy" words are NOT overlapping.  I tried hard and have several tags to prove it but I kept just missing the overlap each time with this particular stamp.  When I looked at the tags I made this was actually my favorite so it is the one I used for my card.  On this one I put the lighter ink colors above and below the darkest color to draw the eye to the center of the tag and in turn to the "Happy Retirement" sentiment in black.  I am hoping to try this technique again to see if I can successfully overlap.  I must be "overlap" challenged!!! LOL!

Thanks for taking a look!
:) Jill

Supplies:
Stamps: Say it with Style, Mega Mixed Messages
Cardstock: White, Hawaiian Shores
Paper:  Digital wood paper
Inks:  Martha Stewart in blues and greens - stack; and Memento Tuxedo Black
Other:  Cheery Lynn Designs: Italian Flourish Doily Die, and Burlap Impression Plate.  Spray paint, tissue paper (doily is made from spray painted and dried tissue paper that was then die cut). Ribbon - RRR and vintage; button - PTI; hemp twine: MFT


Sunday, June 9, 2013

A special card for a retiring teacher...

Hello Friends,
I have one more card to share for this weekend.  A lovely teacher who taught my son for his kindergarten year is going to be retiring at the end of the school year this coming Friday and we are having a lovely party for her this week after school.  I wanted to make a special card for her to show my appreciation for the very special woman she is!  What a blessing it was to have her teach my son!  I am glad that she will be substitute teaching next year so that we can all still see her regularly!

I used the Shabby Tea Room week 169 as my inspiration again as it was still in my head from Saturday night.  Here is the inspiration photo again:

And here is my card  - which draws inspiration mostly from the pillow and the creamer or small jug sitting on the table:


 I wanted the sentiment to be the focus of the card!  I had that glittery heart sitting on my desk with that little rose and I love the way they look together.  The doily is cut from cream felt and is the Italian Flourish doily from Cheery Lynn Design.  The pink edging around the circle die cut is made with some pink tissue paper which comes inside orders from MFT stamps.  (Thanks Kim! )

I love the touch of wood patterned paper at the bottom of the card front which ties in the wood from the inspiration photo.  And some lovely pink lace to draw the eye.  The ribbon is a large spool that I "scored" at the Goodwill near my house. I have a ton of it if anyone wants me to send them some!  I tied a double bow out of it and love the light airy feel it has!
This is the inside of the card.  I love these sentiments!  The "You are simply the best" is from My Creative Time - one of my very favorite stamp companies.  And the other is from Papertrey Ink.

Thanks for stopping by to take a look at my card!  I hope you enjoyed your weekend!
:) Jill

PS: This card is not linked to the Shabby Tea Room because the challenge is closed.  I just used the inspiration for creating my card.  :)