Tuesday, October 30, 2012

Pinecones make me sooooo happy!


Hello Friends,
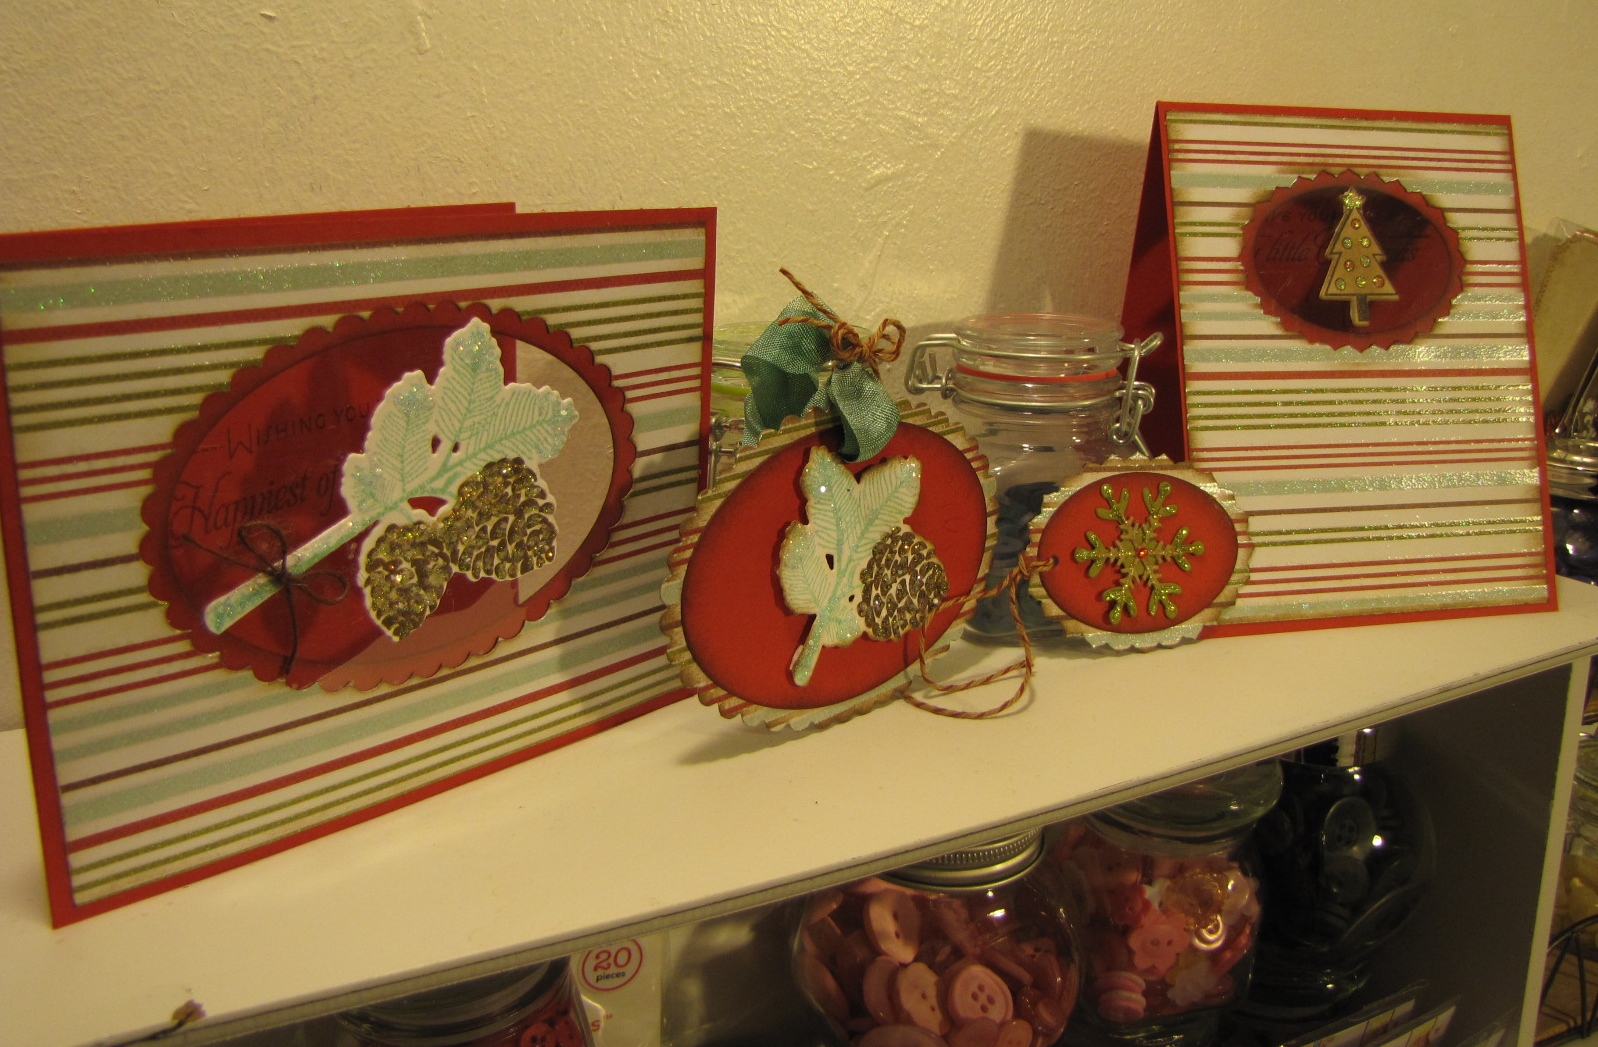
I took some time today to make some cards for "Make it Monday #89 - Creating windows for floating images" over at Nichole Heady's blog. 

I was wanting to use my new Peaceful Pinecones stamp set.  I ADORE pinecones and have them in several places in my home.  I have a wreath made out of varous species of pinecones in my bathroom and a glass of teeny tiny pinecones on my windowsill in the kitchen so I can look at them while doing dishes.  I also tend to have them in the pockets of some of my coats if I find a cool one when I am out walking around the neighborhood or at a local park.  I am especially enamored of the Deodar pinecones that look like roses when they open and have made many crafts with them throughout the years. One of my favorite Christmas ornaments is made with these pinecones and was given to me by my sweet friend Roberta back in the 1980's.  This beautiful ornament has held a place of honor on my tree for many years. Some of you know that garden roses are my favorite flower and I think of these pinecones as my "winter" roses.  They are gorgeous!!!  Here is a picture of them if you have never seen them before:


Anyway you now know (probably way more than you wanted to) that I love pinecones...and because of that I had to get the Peaceful Pinecones stamp set.  I just love it and love the projects I have made with it so far.  My sister fell in love with them too when I showed her the tag and card I made today.  I just love this stamp set - so thank you Dawn McVey and Nichole Heady and Papertrey Ink!  It is just sooooo beautiful!  I am in pinecone heaven!


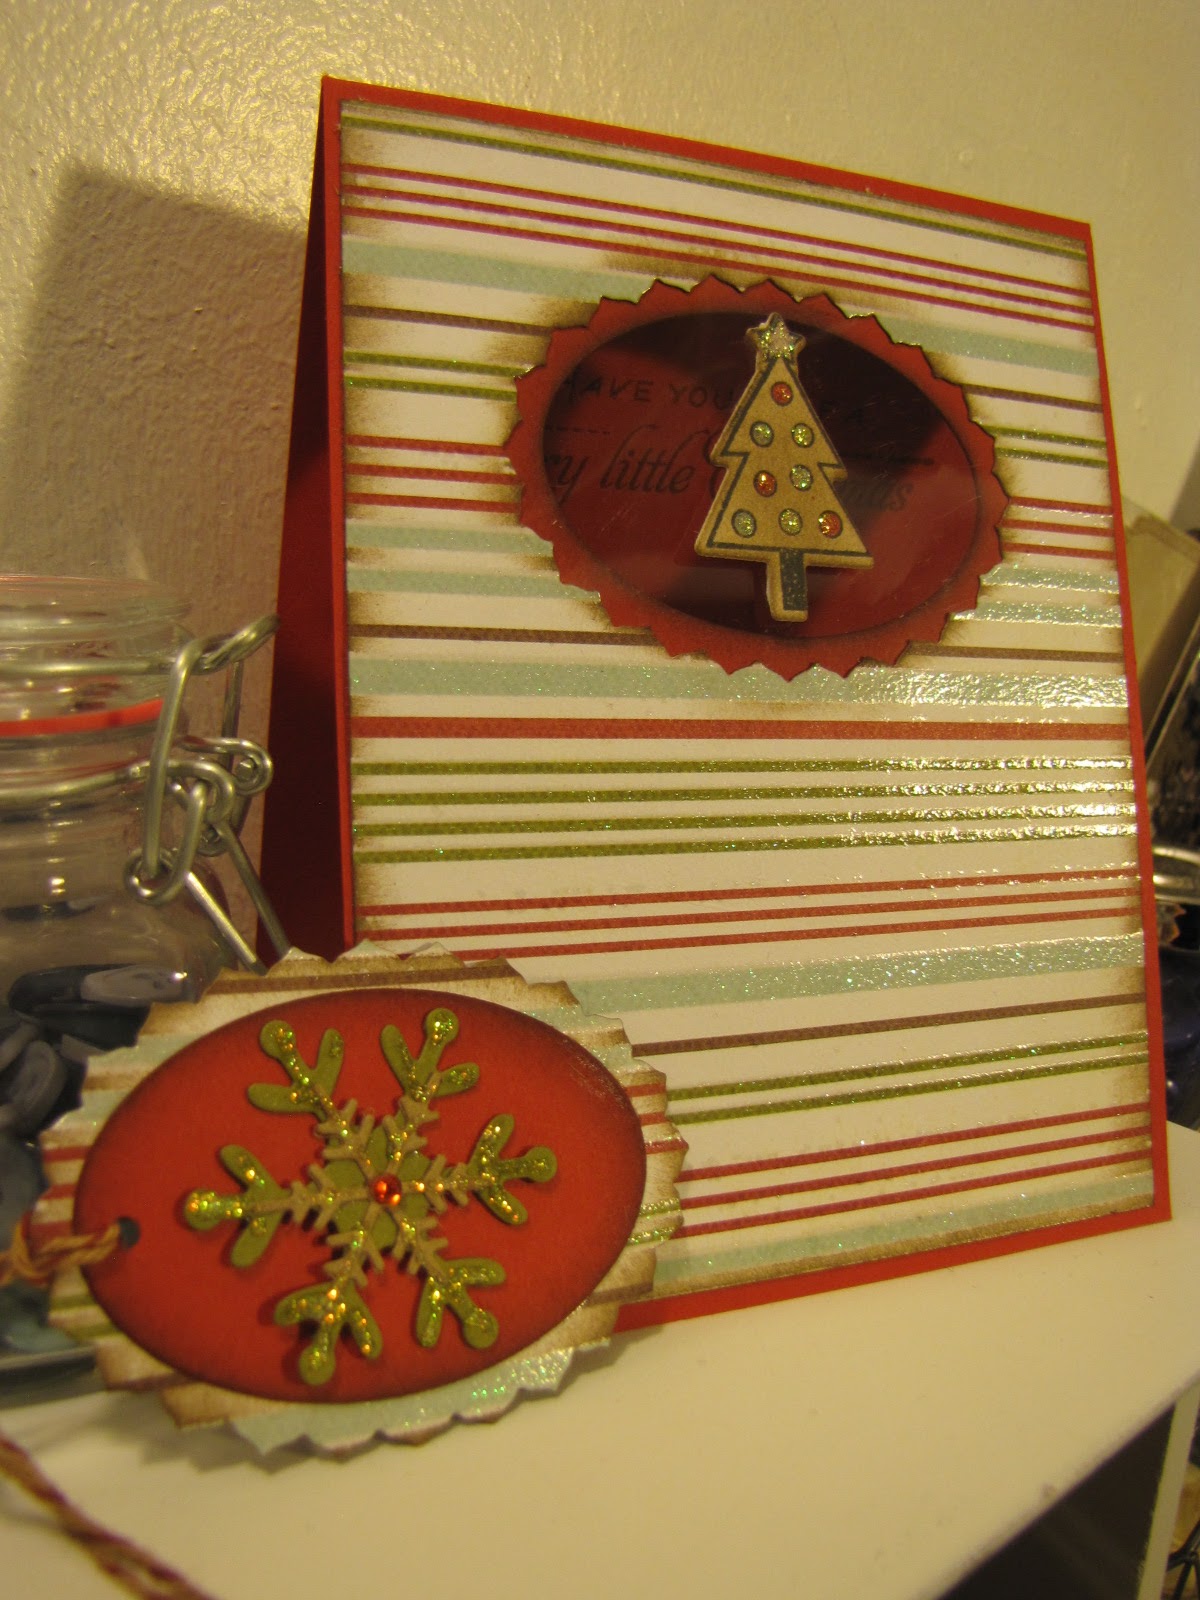
I am also loving the "Winter Snow Globe Stamp Set" and used the little Christmas tree for the focal point on this very simple card.  I made a tag out of the die cut leftovers using some snowflakes left over from other projects that were sitting unloved on my craft desk.  The designer paper is from a 12x12 stack of My Mind's Eye Christmas papers from several years ago.

Thanks for taking a look at my cards!  What stamp sets are you loving the most right now?
:) Jill
 

Sunday, October 28, 2012

You are so sweet!


Hello Friends,
Had a little time on Sunday night to make a card.  My son and I had finished carving our pumpkins and we decided to play for a bit - he on the computer and me in my crafty space.  I was inspired by the beautiful cards over at the C84FN Color Challenge and specifically challenge #66:

There are so many lovely creations by the design team (WOW!!!!) and I had an idea come to mind right away.

I wanted to use a new to me flower die from Magnolia and make some negative die cuts and then place the actual flowers into the negative spaces with designer paper behind them.  On the road to doing this I ended up putting foam tape on the wrong side of my negative die cut piece. This was a bummer because this pretty light grey card stock had such a lovely texture on it.  I didn't want to waste the piece though so I used it anyway and then had to turn my flowers to the wrong side too.  Behind the opening in the Magnolia flowers is a piece of gray flowered Prima paper but you cannot see it very well because of the glitter glue I added to the flowers to make them POP more!  Needless to say my card did not turn out exactly as I wanted it to but it is still pretty I think! 


Thanks for taking a look at my card.  I thought I would end my post with a picture of my son and his wonderful Jack-o-lantern.  I love the face design that he came up with!  I just helped with the cutting!  I love the little carving knives they sell now - much safer for kids that want to carve!!!


Happy Halloween week everyone!  Enjoy!
:)  Jill and my sweet boy Tim

Tuesday, October 16, 2012

My Parents celebrate their 50th Wedding Anniversary...

Hello Friends,
Today I made a card for my parents 50th Wedding Anniversary which is coming up on October 20th, 2012.  Here is a retake of a picture I have of the two of them on their wedding day...and they are just as cute now, fifty years later!  (Sorry about the picture quality but my main computer crashed today and is at the repair shop and using my laptop means that I don't have all of my normal programs at my fingertips...)

My sweet parents, Clark and Jackie, have raised a family of 7 children and are the best role models any child could have.  They are both retired but continue to lead active lives helping all of us kids and their friends, neighbors and extended family on a daily basis as well as being active members in their church community.  I pray at night to become as wonderful a woman as my Mother is.  And I hope that I can raise my son to be as wonderful a man as my Father is.  They are a true blessing in my life and I am so lucky that God blessed me with them as my parents.  Happy 50th Annivsersary Mom and Dad!!!

 In honor of their very special anniversary day I made a card for them taking my inspiration from The Shabby Team Room - week #136: Rustic Elegance.  And a beautiful inspiration photo picked by the lovely and talented Rebecca Deeprose  of Paper Primrose:


I just love the roses and candlesticks with the wood table - shabby chic elegance at its best with that touch of rustic wood!  And there is a ton of gorgeous inspiration in the Tea Room to inspire you if you would like to join in the challenge.


 My card started off with some lovely design paper with small glittered hearts on it.  I then added some rows of light pink felt cut with a heart border die and also used the leftover edges from the die cuts in between the rows of hearts.
My touch of "rustic" elements are two rusty old tin hearts which I lightened with some cream ink around the outside edges and topped with pink jute twine and some I am Roses baby roses.

I also added some felt and glitter details to the clothing of the stamp silouhette I used to represent my parents.  I added some paper and ribbon banners behind the focal diecuts and some doily type half circles to frame their faces.  I could not find any small stamps in my stash to make a "50" with so I hand wrote on a tiny tag for now.  I have an idea to print a tag on my computer and will experiment with that as soon as my computer is repaired and I am able to print again.  For now this will do.  I am learning to always get my "needed" cards done early so that I am not rushing at the last minute.  If I don't have time to print a new tag for this card I can still give it as is. 

Thanks for taking a look.  I would love to hear what you think of it!  I wish I could add a photo of my parents today but I wasn't able to find one tonight.  Maybe I can add it later on....
Smiles,
Jill

Monday, October 15, 2012

A little pair of mittens to warm you....


Hello Friends,
Here today with a card I made just for fun - no challenge in mind I just wanted to play with some new stamps and dies called "Very Merry" that I ordered recently from Taylored Expressions for the start of Holiday card and tag making.

I just had to create that sweet little pair of mittens.  I added the little snowflakes in the center of each and the border of baby pink felt to create warm fuzzy cuffs. I apologize for the picture quality my normal computer is down and I am working on my laptop which does not have my normal picture editing program available.  Alas this appears a little dark to me so I apologize!


 A quick glimpse of the inside of the card:


That is it for me today.  I am off to get my little one from school and it is the start of basketball season tonight too!  Busy busy days!!!  Thanks for taking a look!  Do you have a favorite new holiday stamp/die set?  Would love you to let me know in the comments!
Smiles,
: ) Jill 

Friday, October 12, 2012

A little bit of green paint....


Hello all,
I was doing some blog hopping this afternoon and came upon the Embellish Magazine.com "Paint Color Trends Challenge". 

Here is the inspiration graphic and color pallette:
 
I recently purchased a little 6x6 distressed diamond mask and have had it sitting on my desk ready for use.  I decided this was the perfect opportunity to try it out.  I also have a notebook where I jot down card ideas when they come to me and have been wanting to try making a "felt" christmas tree using the star border dies from Papertrey Ink.  I woke up one morning with the idea in my head and drew a quick sketch in my notebook.  I am happy to report that it came out as cute as I thought it would!


I also chose to decorate the inside of the card as I usually enclose a Holiday letter in my cards and just sign our names to the actual message area.
 
That is it for me tonight!  Thanks for taking a look at my card!  Sorry that the pictures have shadows and are a little dark - it is overcast in Seattle this afternoon and very dark and shadowy even with my extra lighting!!! 
 
:) Jill

Thursday, October 11, 2012

Halloween Scenes....


Hello Friends,
Do you ever have a fairly simple straightforward card idea in your head and have it go in a completely over-the-top unexpected direction?  That is what happened to me this evening when I started to work on a card for the Cloud WPlus 9 blog hop.  I love the inspiration photo:

I loved all the pumpkins, polka dots, the tree and house and the "BOO" spelled out and sitting on the ladder.  I started trying to put a card together but was struggling for a variety of reasons. So I looked at the photo again and decided to free-hand cut a house and as seems to happen with all of my Halloween cards so far this year I ended up building a SCENE card when the original idea in my head was a very simple card.   


The house was first drawn on a piece of cardstock and then hand-cut. I added embossing to the roof using an embossing folder from Stampin Up and then inked it up to give it a vintage type feeling.  I used the WPlus9 smallest pinking square to make my window openings and I backed them with clear cardstock as "glass", some striped paper curtains and some window panes cut from cardstock.  Then I decided to add a banner to the roof line that says "BOO", some clouds, a harvest moon, and a front yard scene including a black cat, some pumpkins, a bird, some flowers, and a yard sign that says Happy Harvest.  The front door of the house has a gingham heart "window" and opens to reveal another heart and a sentiment.  I still felt it needed some "grounding" so I hand sewed some hemp twine around the outside of the base of the card to create a "frame".    I wanted to also add a witch diecut "flying" over the house but the scale of the die that I had available was too big.  It would have been so perfect though!!  Perhaps I can find a bat to add now that I am on the "scene-building roll!?  I will look....

Supplies:
Stamps: WPlus9 - various sets
Cardstock: WPlus9 and PTI
DP: Simple Stories - Harvest Lane
Felt: MFT
Other: Burlap (smoke in chimney); halloween twine, various dies from WPlus9 and PTI.
(NOTE: If you want specific info please leave me a comment!)

Thanks for taking a look at my card. 
: )  Jill

Wednesday, October 10, 2012

Love, Hope and Hugs!

Edited to add:  10-16-2012:  So excited to learn that this card received an honorable mention in the Tea Room this week (#135).  I am so honored especially among all of the incredible projects that were entered.
Thanks so much!


Hello everyone,
I was over at "The Shabby Tea Room" blog tonight taking a look at the inspiration for Week #135 - Beautiful Romance.  Here is a picture of the inspiraton photo supplied by Starr Timmons:


I thoroughly enjoyed all of the absolutely gorgeous inspiration by the designers in the tea room this week!  I saw all of the beautiful projects made including those using the Ribbons of Support Package Templates from My Time Made Easy.  I was so inspired by all of the beautiful projects in The Shabby Tea Room that I went and purchased the template for the ribbon card and paper to make my entry for this week's challenge.

The challenge asks that you use the colors pink, green, white, and lace.  I used those colors along with black and a "paper lace" heart from a die at Cheery Lynn Designs.  I was inspired to purchase the template as a dear friend of mine was just diagnosed with breast cancer and I wanted to make her a special card.  Here is what I came up with: 


I am also going to upload this card to Nichole Heady's blog for the "Make It Monday #86: The Inside Edition" challenge this week which is all about decorating the insides of our cards. 
I am going to get on my soapbox for a minute so please skip to the end if you aren't interested:

In case you didn't know - October is Breast Cancer Awareness Month!  I am going to schedule my mammogram tomorrow!  I hope you will too if you are of the age where you should be having one annually!

Many of you know that I lost my sweet husband Stuart to a grade IV brain cancer called "Glioblastoma" or GBM in February 2012 after a 1 1/2 year battle.  If you or someone you know is ever diagnosed with this type of brain cancer and wants to talk or ask questions about my experiences with my husband please use the email on the right hand sidebar of my blog.  It is a very difficult cancer to fight and I will be happy to share what I have learned.   

To everyone that is fighting cancer my heart is with you! 
To everyone who is helping someone fight cancer my heart is with you too!
God Bless all of the Doctors and Nurses and Researchers on the front lines!  It is a very heart-wrenching job to help people fight this disease and we are so blessed to have their help each and every day!
                                                 
Please eat as many fruits and vegetables as you can each day and be happy - stress helps create disease!
Okay -  I will get off my soapbox now!
Blessings to you all!
: )  Jill

Products used:
Cardstock: Papertrey Ink
Ink:  Memento Tuxedo black; Memento pink
Stamps:  Papertrey Ink: Faith and Hope Stamp Set; and My Craft Spot: Tiny Tags 2
Dies:  Cheery Lynn Designs - Two of Hearts - DL128 - smaller lace heart.  Lil Inker Designs: Of the Heart dies - smallest and largest; Digital Template: Ribbons of Support Package - My Time Made Easy. 
Papertrey Ink:  Tiny Tags Dies; and sentiment banner dies.
Other:  pink paper floss; I am Roses rose; glue dots; tombow mono multi glue; ad-tech adhesive; dimensionals.

Here is a you tube video I made that includes views of the templates, dies, and stamp sets I used:


Tuesday, October 9, 2012

A little black and orange for Halloween!


Hello Everyone,
Oh boy - once again I have not posted in 3 weeks!  Unfortunately I have been sick for most of that time and after a long Doctor's appointment and some tests it turns out it may be my thyroid that is causing some of the fatigue and other issues I have been dealing with.  I will know more when results from some of the tests that were run yesterday come back.  Yeah!!! I can't wait to begin to feel better!!!!

Anyway I finally made a card today and played with lots of Halloween items that I pulled out of my stash over the past couple days and placed in a pile on my crafting desk.  I am going to enter it into 2 challenges - the black and orange challenge at Cheery Lynn Designs and the Make it Monday challenge over at Nichole Heady's blog for Papertrey Ink.

Here is the card that I made:

I used 4 different stamp sets on this card:  Papertrey Ink stamp sets include: 
Halloween Treats and Sweets; Mr. Bones; and Spooky Sweets II.
The adorable witch and pumpkin girls as well as the bat, candy corn and small jack-o-lantern are from a cute set of rubber stamps that I picked up at Michael's by Recollections.   Aren't they cute?!?
The large harvest moon in the background was made with a limitless layers circle die from Papertrey Ink sponged on the edges with black ink.  Behind it the "moon glow" is from a spider web doily die from Cheery Lynn Designs.  I also used the Anastasia Border die B136 from Cheery Lynn Designs along the bottom of my card (cut out of black cardstock) to help ground the images.

The patterned paper is from the "October 31st" line from Fancy Pants Design which I think is a collection from last year?  I edged the paper with my Martha Stewart web border punch.
I tried my hand at coloring with copics again but just a reminder that I am a total amateur and do NOT know what I am doing.  But regardless I always have fun doing it which is what crafting is all about for me - a way to relax and feel happy!
The Make it Monday challenge at Papertrey Ink this week is all about decorating the inside of your cards so I tried my hand at it.  I added a light paper panel to the left half of the inside of the card (not shown) in case I want to write a note to whomever I send this card to.  On the right side I added some edged pattern paper again and a 2.5" oval limitless layers die cut from Papertrey Ink edged in black ink.   I added the sentiment "happy fright night" from Halloween Treats and Sweets and then embellished with a variety of stamps from all 3 of the Papertrey Ink sets I listed above.   I just love that kitty with the swirled tail don't you?  So fun!!!

Here are some links to the two challenges I entered this card in:  !

Cheery Lynn Designs Challenge #49 - Black and Orange
                                     and
Papertrey Ink's Make it Monday #86: The Inside Edition

I hope you decide to play along with me!

Thanks for taking a look at my card!  I have been peeking at what others are making for both of these challenges and am thoroughly enjoying all of the lovely inspiration!!!!  I love Halloween season!  It is so much fun!  I hope to get around to visit all of my crafty friends blogs in the next few days to say hello and see what everyone has been up to.  I got to check in with a few of you today and my oh my so many gorgeous and fun projects that I have missed of late!!!! 

Happy crafting friends!
: )   Jill