Sunday, August 26, 2012

I am "hooting" along to Make it Monday on Sunday night....

9-3-2012: Edited to add: Post Script at end...

Hello Everyone,
It is Sunday night and I am finally uploading a project using fabric for this week's "Make it Monday #79 - Fabric Die Cuts" post over at Nichole Heady's blog: HERE.

I also drew inspiration from two other sources for my project.  The first source is a post titled "guess whooo loves you" at Lilybean Paperie - Melissa Phillips beautiful blog.  She made two beautiful owls using the onsie die and I really have been wanting to try it since I saw it. (She has a great tutorial on her blog showing how she made them!)  And tonight was my night. She also made the video for this week's Make it Monday and I think the fabric die cuts were the perfect partnership for this project!

The other inspiration that I used was the CR84FN61 challenge: HERE.  Here is the inspiration photo for this week:
This will be my first time participating in the CR84FN challenge.  I love this challenge and its incredible team and participants!.  But it is only recently that I have begun to have personal time to participate in challenges more frequently.  I am finding that I really enjoy both sketches and inspiration photos/videos to spark my creative spirit. So thanks Nichole and Mona and everyone else who helps to make all the different challenges available to all of us!

And thanks Melissa for the wonderful OWL's you created!  I followed your gorgeous samples very closely!  They are both so adorable!!! I loved the negative die cut tag you made too and I took my alphabet die apart so I could do it too!

Here is my owl made with linen fabric, burlap, felt and embellishments:


I used a flower die from MFT to make "feather" borders out of felt on my wings.  I used a linen fabric for the owl's body.  And burlap for the "belly".  The talons are felt leaf die cuts.  And the little crown is from Maya Road and was sent to me by Sarah Martina in a "blog candy" gift a long while back.  So happy I got to put it to use!  Thanks Sarah! She is amazing too!!! Love her blog of inspiration and visit often!

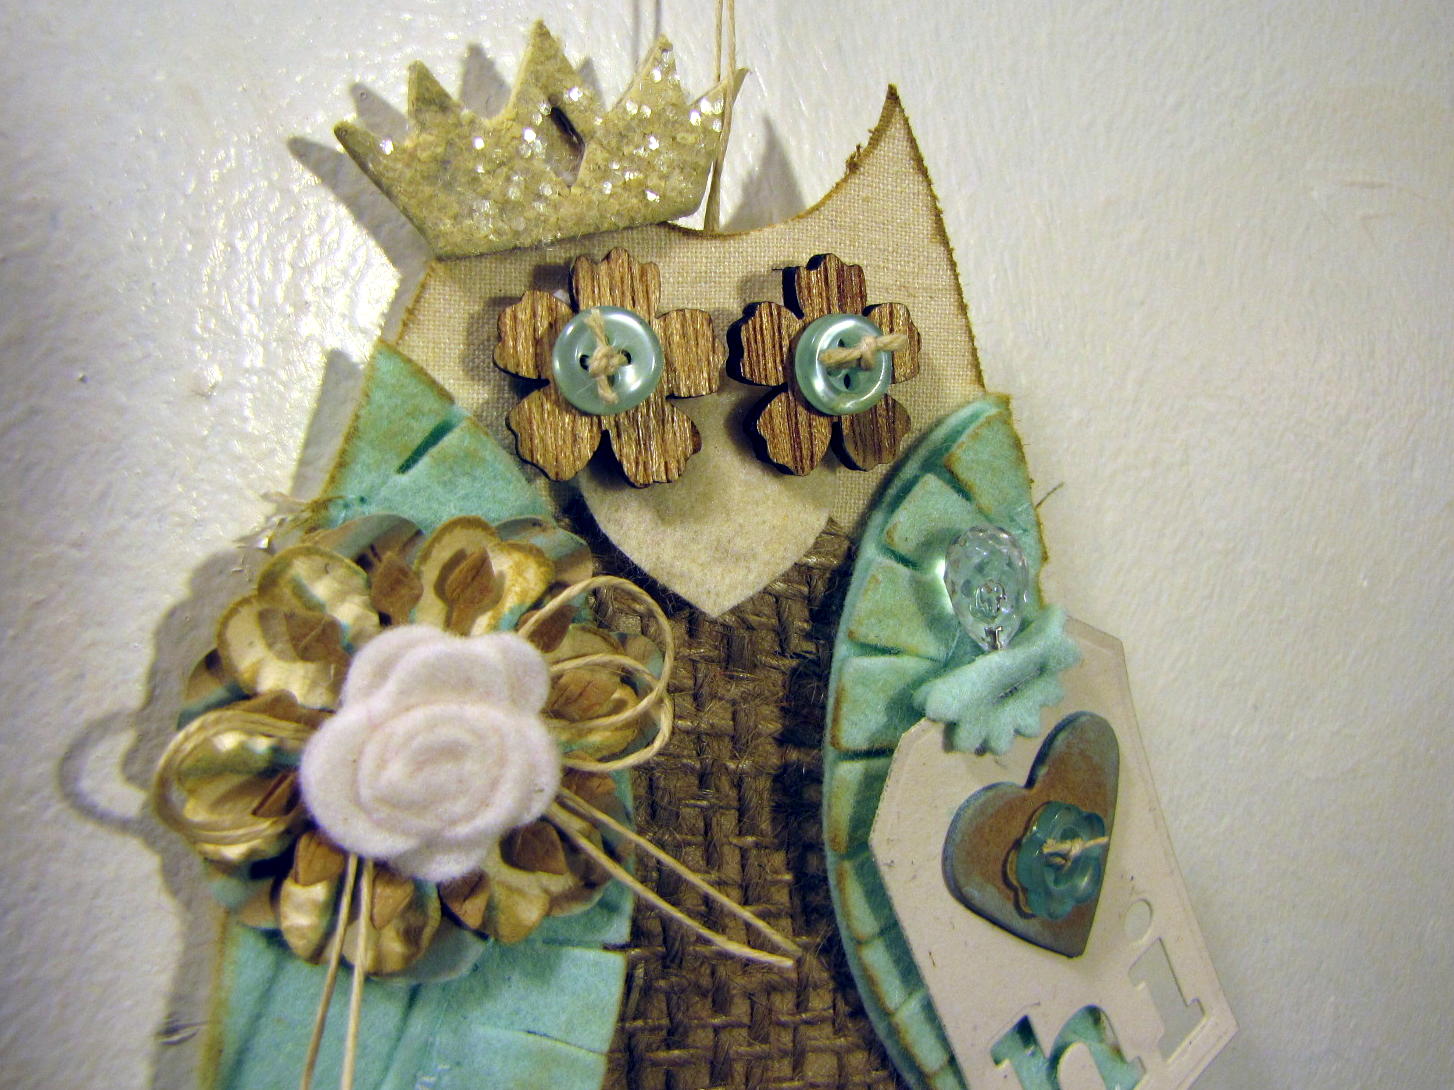
Here is a close up of the eyes made from Prima and Papertrey Ink buttons.  And the flower is a hodge podge of scraps from my flower "leftovers" jar. 

That is it for me for tonight.  Off to bed...thanks for taking a look at my little owl! 
Hoot Hoot!!
:) Jill

Post Script:  I am so blessed that my little owl was one of the projects chosen for the "top 3" over at the CR84FN challenge blog among all of the incredible links!  Thanks to everyone at CR84FN - I love your challenges and all of the inspiration they provide!  If you are interested you can see the post and the other incredible winners for challenge #61: HERE


Saturday, August 25, 2012

A little Pretty Patches Apple from WPlus9 for back to school time....

Hello Everyone,
I am here tonight with a card using a new little gem of a stamp set from WPlus9 called Pretty Patches: Apple.  I am still working on some cards for all of our favorite teachers at school and this set has been calling my name since I received it in the mail! 

I used retro sketches #26 to design my card.  Here is the sketch:
And there is a TON of gorgeous inspiration on their blog!!! Love it!

Here is my card:
 I made a window in my card base using the largest "Pinking Squares" dies from WPLUS9.  And then I created a "frame" for the window using red cardstock and the two largest dies again.  I seem to be really into making negative die cut spaces or windows in my cards this week!
 This is a side view of the window and a close-up of the beautiful perfect patches apple stamp.  I stamped the apple in red then colored the stem brown with a copic marker and added the adorable leaf in green ink before cutting it out and popping it up on an additional pinking square diecut stamped with a background from the "Country Charm" set also from WPlus9.  These were adhered through the window to the inside of the card. 
 And here is a first - washi tape on my card!!!!  I have picked up a few rolls of red and black tape for back to school projects and decided to be BOLD and BRAVE and try them out!  I must say they are  easy to use, easy to move around, and easy to cut in half to get any width you need!

The sentiment is from a Papertrey Ink stamp set called "School Time" and is selectively inked up to  say "I LOVE SCHOOL" only one time. 
 Here is another view from the side.  I used the WPlus9's Chevron Impression Plate (LOVE THIS!) on the card base to add texture and then inked it with various distress inks adding a little bit of tuxedo black to the edges.  I was going for an "old time" or "vintagey" looking school card.
Here is a picture of the inside of the card.  I also inked the inside lightly with distress ink and added the sentiment "so very thankful" also from Pretty Patches: Apple.  I think I may go back and add the word "Teacher" up at the top left of the die cut if I end up giving this to a teacher.  I like to leave my options open as it may end up in the Principal's hands or Office Staff's hands too.  I have had so many people support my son and our family while we were going through my husband's cancer and death that I am always wanting to give back and say thanks to all the wonderful people at the school.

Thanks for taking a look at my card.  I am sure enjoying the smaller sets of stamps that I have been purchasing from WPlus9.  Pretty Patches Apple is only $6.00 and it is a little powerhouse of beauty in my opinion. My crafty budget loves the smaller sets.  I get new things to play with and I don't break my vow not to overspend! Until next time!  Happy Crafting blog friends!

:) Jill

August 2012 Blog Hop - Papertrey Ink

Last night I made a card for the August 2012 Blog Hop over at Nichole Heady's Blog for Papertrey Ink.  You can see the blog hop post and everyone's incredible projects: HERE

Here are the inspiration photos:
Blog-hop-1


Photo credits on Nichole Heady's blog - see link above


I love all these textiles! Autumn is such a beautiful season and I am always ready for the cooler temperatures and the sweaters, scarfs, tweeds and woolens that come with it. I decided to go with a fairly clean and simple card this time especially when my order arrived from Papertrey this afternoon with my new herringbone background set and impression plate to play with.


Here is my card:
First I used the new herringbone impression plate to emboss my smokey shadow cardstock. 

Then I used rustic cream cardstock and smokey shadow ink to create my herringbone panel after creating a 1.75 inch circle mask and having it hang partway off of the piece I was background stamping. 

I then added a strip of houndstooth patterned paper cut with the pinking die and inked with some wild honey distress ink to darken it to this lovely color. 

Next I created a frame for the masked circle with a limiltess layer 1.75 inch circle die out of smokey shadow cardstock and stamped my sentiment which is from the "We Go Together" stamp set. 
To embellish the card I picked 3 buttons from my stash to pick up on the grey and gold tones of the card and create some visual triangles as well as try to follow the rules of three. 

I love the sentiment on this card as I could use it for a variety of things....I left the inside blank - see picture below....but could even add a birthday sentiment and give it to my brother for his upcoming day...I love the masculine feel of this card!

Thanks for taking a look at my card!  I would love to know what you think of it!  I cannot wait to hop around and see what everyone creates today!  Happy crafting and hopping!

: )   Jill

Thursday, August 23, 2012

The-e-e-e First Verve-OEL...a little Christmas in August for the Verve Card Carnival

Hello,
Here tonight with a card for the Verve Card Carnival in hopes that I will win their GRAND PRIZE of the full release of all their new stamps!  If you haven't been following their blog hops and all the excitement of their anniversary please check out their BLOG.  There is some incredible inspiration along the way and something will be sure to inspire you to make a card.

I went through my Verve stamps and decided to ink up a Christmas set called Glad Tidings. Here is my card:

I really wanted to get a card entered for the chance to win but I am not sure that I am satisfied with the layout of this card that I made.  I liked the background stamping I did with the snowflakes in the set.  I like the wreath also as it is one of my favorite images but I don't like the patterned paper that I stamped it on and I forgot to emboss the white focal piece that sits on top of the doily and couldn't remove it after I adhered it without ruining the card!  I also don't like the way I placed the flourish...Oh well...not every card is going to be a favorite and I did have fun making it! 
 

I also really like the way the velvet ribbon turned out! Love red velvet at Christmas especially layered like this!

 
Thanks for taking a peak at my card for the Verve Card Carnival!  Hope you get to join in for a chance to win all of the wonderful upcoming release!  They are also having a HUGE sale right now on all of their existing stamps...and I am so tempted to spend a little money....we shall see....I am trying to be GOOD and play with what I already HAVE as it is the playing that makes me happy and feeds my inner bliss!

Happy Crafting my friends!
: ) Jill
 

Another school card...

Edited to add post script at end of post below on 8-28-12
Hello all,
Here today with a card for Waltzing Mouse Sketch Challenge #111.  Here is a picture of the sketch:
WMSC111

And here is my card:
I used a new to me set from Waltzing Mouse Stamps called "Blessed By You" to make my background and my little school house.  I just love this set and will be making lots of cards with it in the future.  The sentiments are just so lovely and the little images are so wonderful for creating backgrounds which I have been trying to do more of lately. 
 
To finish my little "scene" on the focal area I supplemented with some other school stamps that I had in my stash so I can use this as a "school" card for one of my son's many teachers. I doodled some clouds and a sun as well as the smoke from the chimnies of the school.  Not sure if I love it but it will do.  I also distressed inked my black and white gingham ribbon to help it match the card better.  I used "old paper" distress ink to add an aged look.

I used white prima chalk ink to make a "chalkboard" outline on my red die cut focal and also impressed the yellow cardstock with an alphabet impression plate to add to the school feel. A button and some twine finishes it off.

Thanks for looking at my card.  I had fun making this one and was inspired by several cards made by both Claire and her mischief makers in some of the pre-release hops that are going on right now at Waltzing Mouse Stamps Blog.  I sure like the sort of "toile" look that it creates.

Happy Crafting everyone!
: ) Jill 

 Edited to add 8/28/12
Post Script:
I was so thrilled to learn that my card was one of the top mouse cards of the week for this challenge!
It was announced at this post on the Waltzing Mouse Challenge Blog: HERE.  There were so many incredible cards for this challenge and I am so very honored that my card was chosen with Ren-Yi and Michelle's for a top mouse blog badge!  Thanks to everyone that is involved in providing these wonderful Waltzintg Mouse challenges to all of us.  And thanks to Claire for her beautiful products!  They are such a gift to my crafting life and my bliss! 

Wednesday, August 22, 2012

Thinking of Autumn...a card following Freshly Made Sketches #49

Hello,
Wow - two posts in one day for me!  Love it when I get to play for an hour in the morning and an hour at night! 

Tonight I worked on a card for my son's teacher as my little one will be heading back to school in just under 3 weeks now.  Thought I better start getting prepared as I hate trying to do everything at the last minute as there is never enough time once September arrives! 

I used the sketch from Freshly Made Sketches #49: HERE.  This is the picture of the sketch by Jen Mitchell:

Isn't it a great sketch! I had so many ideas floating through my head and could make a TON of cards with it...if I only had unlimited time in my crafty room....

Here are some pictures of my card:

I used a lovely stamp set by WPlus9 called "Winter Wishes" to make my "sweater" circles. 

"Autumn" and "Back to school" always makes me think of cozy wool sweaters and warm autumnal tones of browns, taupes, creams, and mustardy colors.  Not to mention textiles in general so I embossed the background with a chevron impression plate also a product from WPlus9.  The kraft panel is embossed with the "Old Parchment" embossing plate from Cheery Lynn Designs.  You can see the texture this adds better in the next photo.

The "Autumn Wishes" sentiment is from a set concepted by Michele Wooderson for Papertrey Ink called "Friendship Jar Fall Fillers" and is one of my favorite fonts.  The little acorn is from that same set and is colored with copic markers.  The die cut is from a My Favorite Things die. I liked the half circle edge as it mirrored my "sweater" circles below.

Those little baby tags show my love for all things Autumn.  They are from Stampin-Up's "Tiny Tags" set.  I use up my scraps making baby tags with their matching tiny tag punch and stamping them with a variety of stamps.  They sure are wonderful to add as embellishments to cards.  I always have a stash of them on my desk. 

Here is the inside of my card....another sentiment stamp from the Fall Fillers stamp set from Papertrey Ink.

Thanks for taking a look at my card! Happy Crafting!
: )  Jill

My Angel Sister....

Edited to add a post script at bottom of this post. 8-30-2012
Hi all,
Here with a card that I made for my sister Diana.  She is my youngest sister and means the world to me. 

The day she was born my Mom called the school (I was in 8th grade at the time) and I walked home to babysit my 2nd youngest sister Beth while my Mom drove to the hospital to deliver our sweet Diana Rose.  My Dad met my Mom at the hospital because he had to take the train from Chicago, he worked at the Sears Tower at the time.  

My sweet little Diana Rose is now a lovely woman and this card is to thank her for being such an angel in my life over the past couple years.  She has been there for me at some of the most difficult times of my life.  She is a beautiful lady inside and out!  Here is the card that I made for her:


This card is being entered in the Cheery Lynn Designs challenge #42, which is all about doilies.  You can find the challenge information over at the Cheery Lynn Deisgns Challenge Blog: HERE 

Here are a few more pictures of my card and of the Cheery Lynn Dies I used to make it:

I used the French Pastry Doily (DL102) to create my angel.  I cut it into 6 equal pieces and used 3 pieces to make the angel.  I only removed the piercings at the "sleeves" and "hem" of the angel wings and robe and left the other piercings solid as I liked it better this way while designing it.  The angel's halo is the center piece from the Nautical Wheeler Doily.  The main portion of this doily die is peeking out from behind the purchased white paper doily as a beautiful decorative edge.

I used a lovely button for the face and added some twine for the hands as well as a rose "bouquet"
for her to hold.  You can also see the Tiffany Border B137 in this photo. 

I die cut two of the decorative corner dies and made a medium size rose with the mini and medium rose dies.  I added a baby rose from "I am Roses" tucked inside for the center of the bloom.
I then placed two more of these small roses on either side of the larger bloom.
These are the Cheery Lynn Designs dies that I used on my card.

This is one of the newest dies from Cheery Lynn Designs August release - "Embellishments #2".  I love all of the little pieces for making flowers and even leaf backings for handmade flowers.  I cut some of these pieces in hunter green to back the corner roses that I made for my card.  This is a fantastic die for flower creating!  I hope to play with it some more and maybe post a video!  There is so much you can do with the first two "build a flower" series released by Cheery Lynn Designs especially when you combine them with all of the other flower dies in their store!

Thanks for looking at my card.  I can't wait to see what other Doily creations are uploaded for this challenge.  It is always so fun to see all of the lovely inspiration! 

Jill

 Edited to add:
Post Script:  So excited that my card was chosen among all of the incredible entires for a "Weekly Spotlight" top 4 this week!  Thanks Cheery Lynn Design Challenge team!  I appreciate it so much!

Friday, August 17, 2012

Yeah! It's Waltzingmouse Blog Party Day!

Hi Everyone,
Here with a card for today's lovely Waltzingmouse Stamps Blog Party!  I am so excited to play along!

Blog-Party-Logo 70%25

The theme this month is "Birthdays" and you can find all the info and the linky party: HERE
I hope you are able to find some time to play along! 

Here is my contribution:
 I used a whole bunch of Waltzing Mouse Stamp sets on this card:
1. Vintage Banners
2. Nordic Winter
3. Jar Fillers - Jam Packed
4. Say it Loud
5. Compact Sentiments - inside sentiment - not shown in pictures

 I just love the gingham banner in Vintage Banners!  I added some of the border stamps from Nordic Winter to the top in pink and brown to dress it up.  The "hip hip Hooray" sentiment is from Vintage Banners and is stamped on a label from Jar Fillers-Jam Packed.  The "it's your big day" sentiment is from "Say it Loud". 
The pink doily is from Freckled Fawn (HERE) and I just love it!  The pink cardstock is impressed with one of my favorite designs: the old parchment impression plate from Cheery Lynn Designs.  A rolled rose and leaves die cut from felt, along with a bow made from green hemp twine and some "I am Roses" baby pink rosebuds finish off this card.

Thanks for taking a look at my Birthday card!  I sure enjoyed getting crafty this morning to make it!
I am off to spend some time with my little one in the Seattle Sunshine now....we are getting together with all of his preschool friends for a "back-to-school" party so it should be fun!  I have known all these sweet kids since they were 3 or 4 years old and now they are all 7 and 8!  Time flies so I am trying hard to treasure each moment!  Have a great day and happy blog hopping!  I can't wait to get home tonight and see what everyone has created! Bye for now...

:) Jill

Sunday, August 12, 2012

A little Halloween fun....

Hello,
Tonight I took some time to whip together a little card for the Cheery Lynn Designs Challenge #40 - Shaped Cards HERE.  (NOTE:  I also updated the look of my blog this weekend in case you are wondering what seems different....)

I debated on what shape to make but since I was feeling in a fallish mood I opted to take out some Halloween stamps and use the XL-6 Circle-Inverted Scallop Large Stackers Nesting Dies.  Since I decided to go with a Halloween/Fall theme I also took out the new to me D133 dies:  Small Leaves #1.  This is a lovely set of 4 leaves plus the sweetest little acorn die you have ever seen!   I cut them with some kraft cardstock and added some ink distressing.  I am totally in love with that little acorn die (and the leaves too with all their sweet embossed dimension) and you will see that I used two of them on my card below.

Here are some pictures:
 Here is my card.  That stamp is one I got at Michael's several years back and is still one of my favorites.  After coloring it with copics I added an outline and background with my BG10 copic to help the image stand out from the background. 
I made a little bow with some leftover ribbon from some packaging, some hemp twine and the mini-roses die - which is not pictured in my "dies I used" photo below as I couldn't find it when I went to take my picture....hmm...messy craft room right now....YES!

 This is a close up photo of those adorable dimension filled acorns.  I almost wish I hadn't added the glitter glue so you could see the tops clearly - these are just sooooo cute!  I think I want to make a banner with them for a Thanksgiving card next!  I am in love...I would like to get them in all the sizes available but I am on a budget - LOL!!!!  Maybe someday.....
Cheery Lynn's newest flower dies have the coolest centers to be used for stamens.  Here I cut one of the stamen dies out with black cardstock and made a spider with it.  Of course it is a 12-legged spider but hopefully no one will care?!  I think he is cute!  Also do you see the dimension on the leaf die cut out of kraft cardstock behind it - LOVE IT!

I cut the rose leaf trio out of aqua felt and cut one leaf off.  It looked like a cute little aqua bat ( I am definitely going to make one again with black felt and add some googly eyes on a different card) until I added the flower and acorns...I needed the flower etc. on the card for balance - rules of three and all that!
 Here is a picture of most of the Cheery Lynn Dies that I used.  I used the spider web doily die on tons of my Halloween cards last year - it is also a favorite of mine!  This time I cut it out of vellum and added glitter glue as if there were morning dew on the web.

I also used a Papertrey Ink notebook paper die (not shown above) to stamp my focal point and to back my focal point with orange cardstock.  I don't know if you can see it in the pictures but the orange piece of "notebook" cardstock was embossed with the burlap impression plate shown in the photo.  This is one of my favorite impression plates from Cheery Lynn Designs.  I love the XL size!!!!  It is almost 6" by almost 8"!

Thanks so much for taking a look at my little halloween card!  Only 24 more days of summer here in Seattle....school starts during the first week of September!  Trying to make it last.  Hope you are enjoying yours!

: )  Jill

Thursday, August 9, 2012

A card for the Cloud 9 blog hop...

8/16/2012:   Edited to add:  Postscript:  see end of post....
Hello,
Here tonight with a card I made for my Dad to thank him for helping me (and my son Tim) with some work at my house this last week.  Since my sweet Stuart passed away (it will be 6 months on the 15th of August) he has volunteered to help around the house with some maintenance that was put off during my husband's long illness with brain cancer.  I wanted to make a special card to thank him and this is what came to mind when I saw the sketch on the Cloud 9 site: HERE.  It is a card that says, "Grandpa, Work Less, Fish More." and is made with WPlus9's "Fish More" stamp set which I just love!  My Dad loves to fish and I thought it was the perfect card to send him a little note that says I appreciate all that he has done to help me this summer - and how I hope he takes some time now to himself to go fishing!!!

 I had this idea to make a "fishing hole" with a circle die.  I added some waves for water and then made a fishing pole out of a piece of kraft cardstock, a button and the stamps in the set. 
Here is a full shot of the card too.  I may have to redo it because as I was finishing the card I ruined the cream cardstock on the right hand side a little bit.  I tried cutting part of it off and distressing the edges but it still doesn't look "perfect".  The design is half the battle so whipping out another one of these soon shouldn't be a problem....right now I am off to put my little one to bed for the night or I would fix it and then post....but I have learned to post and fix later since I often do not make it back to my craft room and blog posts in time for the deadlines and end up not posting at all!

So....thanks for taking a look at my slightly marred card!  I was so inspired by all of the wonderful designers and can't wait to go and see what others have uploaded to the linky!   If you love WPlus9 stamps then you probably have already seen their new release with the adorable scarecrow and quilting dies and MORE!  I was lucky enough to win the 1st days release sets in a drawing and am so excited to receive them and PLAY, PLAY, PLAY!  Thanks again Dawn for my prize and for your inspiring stamps!  Thanks Cloud 9 for holding these amazing blog hops!  I am so excited to join in for the first time tonight! 

Happy Crafting everyone! 

: )  Jill
Edited to add (8/16/2012): 
Postscript: 
Hi Everyone - I just found out that my card was chosen as the winner among all of the outstanding entries for the August 2012 Cloud9 blog hop.  I am so excited and surprised!  I thought I would add the last picture of my card (that I took after the original post but never made it back to add).  Thanks so much for choosing my card!  I am so very honored!!!  And a little shocked too! :)

Wednesday, August 8, 2012

Have I told you how much I love to read?


This afternoon I spent some time in my craftroom playing around with the gorgeous inspiration in "The Shabby Tea Room":  HERE

Here is the creativity/inspiration photo from Lenet:


I love the picture of the old books, the soft neutrals, the white in the bedding, the cream and texture in the nubby blanket on the chair, and the touches of pale blues in the framed pictures.  Gee, I could move in to that photo and be perfectly happy!  LOL!

This is my first time actually linking up and playing with everyone at the Shabby Tea Room.  I have visited all of the gorgeous inspiration many, many times over the past couple of years but did not have much time to play due to the circumstances I was in with my husband's illness.   This week I saw my crafty friend Rebecca's lovely post on her blog (she is also this week's Guest Designer) and absolutely LOVED what she created!  After reading her post I visited the site and was determined
to join in this week-  which I was able to fulfill today. 

Here are some pictures of my project.

 I love this sentiment...."This is where I fell asleep"....as it is how I go to sleep most nights of the week.
 I sewed a lovely border of tissue paper scallops with some aqua thread and in the end covered most of it up...oh well.
I love how these old book page flowers turned out!  And some aqua felt leaves to go with them doesn't hurt!


 I made this card and matching bookmark for my son's school librarian who has been very supportive to me and my family over the past two years.  When school gets underway I find it hard to find enough time to make as many things as I would like to have to thank the teacher's and staff at school for all they do.  They are under-paid, over-worked and so dedicated to helping the future generation that I wish I could give them all a raise and a bonus!  I am glad that I can at least give them a handmade card and a treat with maybe a latte-card thrown in or a gift card to Barnes & Noble.  Our cousin Barbara is a teacher in California and she says - give them chocolate!!! Teachers love to receive chocolate!!!  I tend to give coffee cards because I think there are many days in rainy and cold Seattle where a cup of coffee is the perfect pick-me-up before school starts!  And a mocha latte is the best!!  What could be better than chocolate in our coffee?!?

That is it for me this evening!  Thanks for taking a look at my card and matching bookmark! I would love to hear what you think!  I wasn't too sure about my card's layout and the rules of three but I just went with it in the end....

:) Jill

Supplies:
Stamps: All Booked Up - Papertrey Ink
Papers:  Cardstock: Papertrey Ink; Old Book - from thrift store
Dies:  Cheery Lynn Designs: Doily Die; Papertrey Ink -Mat stack and Limitless Layers 1.5" set and sending you leaves; Stampin-UP/sissix - butterfly; MFT- border die medium scallop; flower dies
Impression Plates:  Papertrey Ink - lines/siding, Cheery Lynn Designs - burlap
Ink:  Papertrey Ink - Kraft, Aqua Mist,  Copics BG10
Sewing Machine: Janome Sew mini; Coats & Clark thread
Felt: Papertrey Ink - Aqua Mist
Other: scissors, fiskars paper trimmer, Vagabond, glue dots, ad tech adhesive, tombow mono multi glue