Monday, December 26, 2011

December 2011 Papertrey Ink Blog Hop - Holiday Leftovers Challenge


I don't know about you but when I am designing cards I always end up with a box full of leftovers or discards from each one I make.  I try this or that out and don't like the way it looks...die cut some paper and then change my mind about the color or shape and end up die cutting another.  The items that I don't use end up in a pile (often a very messy pile!) on my craft desk feeling lonely until I find a project to use them on.  This "pile of discarded items"  is what I dug through to get the start of this card. 

I had already stamped the coffee mugs and candy canes (from a series of cards that I made for my sister to sell at her coffee shop here in Seattle) so they were left overs. (Note:  I cut these stamped images out by hand because I could not find my die at the time - luckily it later turned up!)  I wanted to add something different to this card so I decided to stamp the marshmallows from the "Friendship Jar Holiday Fillers" set and decided to try and fit all 3 mugs on one card.   The diamond patterned paper was a leftover from a 6x6 sheet that I had used on another project and the button was already threaded and not used on another project too.

I added glitter glue to the stamped marshmallows and trimmed the piece up to fit the coffee cup.  The glitter glue caused the ink to run a bit but I kind of like the way it looks like the marshmallows have cocoa on them.

All in all this card came together quickly because I used all the discards from my desk to make it.  I will try this again as it made for a quick card!


Sunday, December 25, 2011

Merry Christmas and Happy Holidays from our home to yours!

We wish peace, love, and joy to you all on this most special of days!  May your day be full of the blessings of family and friends and shared laughter and giggles and Christmas magic!  Happy Holidays from our home to yours...here is a little of our Christmas in pictures...


A year ago I thought that Christmas 2010 might be my last Christmas with my husband.  Here we are at Christmas 2011 and he is 1 year and 5 months into fighting his brain cancer called Glioblastoma Multiforme IV.  This year each day has been lived as a blessing....each little moment of shared laughter, giggles, tears, and frustrations has been a blessing from God.  We have learned not to sweat the small stuff - and that it is all small stuff when you are truly fighting to live.  We know that each day is truly a gift from God and we are so happy to be celebrating this most holy of seasons together as our little family of three once again.  Merry Christmas, Happy Chanukah, Happy Kwanzaa and all holidays to everyone!  We are all the same - we all want peace and happiness in our lives and the lives of our families and at this time of year I feel love surrounding all of us everywhere!  From our home to yours we wish you all the best now and in the coming year!
With hugs,

Jill

Monday, December 19, 2011

Make it Monday #46 - Any die into a folded tag...

I made some tags for the Papertrey Ink Make It Monday #46 challenge.  I made these before I was able to get on the computer and watch the video.  I had seen the title of the Make it Monday earlier in the day and was playing in my craft room while waiting for some laundry to dry and made these three lickety split.  Now that I have watched the video I like the way that Erin did it better so I am going to make some more using her methodology next.    Here are some pictures of my first round:


Thanks for taking a look at my post.  I hope you are enjoying your holiday season! 
: )   Jill

Some more Christmas Cards 2011...

A few more cards made for the Holidays:


Cheery Lynn Designs Card Challenge 7: Tis the Season

Hello,
I am entering the card below in a challenge over at the Cheery Lynn Designs blog: here.  The challenge requires the use of one Cheery Lynn Designs die.  I used the French Flair scalloped stackers and classic silver stackers on my card. 

The tree is from a template and hand-sewn with hunter green twine from the Simply Ribbon Store. The star is from some gold twine I had on hand in my stash.  The sentiment and bird stamp are from Papertrey Ink.  The paper and cardstock are from Papertrey Ink and Basic Grey. 

I adore Cheery Lynn's dies and have many in my craft area!  So happy to see that they are now sponsoring crafty challenges.  This week's sponsor  "Di's Digi Downloads"  (here)  has a great prize of a $10.00 gift certificate.  I hope I win because I love her beautiful designs!  They would be so much fun to make cards with!

Thanks so much for taking a look at my card!  Happy Holiday Season and happy crafting!
:)  Jill 

Saturday, December 17, 2011

More Christmas Cards for the Cure - 2011

Recently my sister Beth talked me into selling some of my cards at my sister Natalie's coffee shop during the Christmas season.  I told my sister Natalie that we would give the money we made from them to charity or cancer research.  Due to my husband's cancer situation I don't have a lot of free time to make cards anymore but I usually manage to make about 4 - 6 a week on average.  So far my sister and her staff have sold over $70.00 worth at $3.50/card.  I am looking forward to sending a check at the end of the season to cancer research in my husband's name or to a local women's shelter here in Seattle called Mary's house or possibly some to both.  This time of the year always makes me reflect on all of the blessings in my life.  My husband and son, my extended family, my cozy house, food on my table and money to pay the bills plus a little extra for fun and entertainment.  There are so many people struggling right now that it makes me feel better to be doing something to help out those that are having a hard time right now.  Our family was struggling in this way just last year with no money coming in for a long stretch after my husband's brain cancer surgury which forced his early retirement.   It is a difficult situation and I now feel fortunate to be able to pay it forward a little bit.   

Here are some of the cards I brought to the shop this morning:


That is it for today....I am working on some tags currently and if I get them finished this weekend I might do another post.  Thanks for visiting and taking a look.  I love reading people's comments. 
:) Jill

Thursday, December 15, 2011

Make it Monday #45 - round 2

Hello - here is my second card for the Make it Monday #45 - coloring with copics on embossed images.  I think I will be doing more of this because I am still playing and learning with each attempt. 

I decided on the wreath image becaue I thought adding the brown color outside of the embossed lines would make it look more like different shades of wood.  I used white embossing powder and will switch to clear for my next attempt.  Having fun playing though, and getting some holiday cards made for my son's teacher and close friends.

Edited to add:  Please Note:  The little snowflake stamp used as a background on the red die cut is from amuse art stamps.

Thanks for looking!
:)  Jill

Monday, December 12, 2011

Make it Monday #45 - Coloring embossed images with copics

Hello fellow cardmakers,
I had some time tonight to make a card for Papertrey Ink's Make it Monday challenge #45.   You can get all the info on Nichole Heady's blog:  Capture the Moment.

I needed a card for my son's teacher for the Holidays and I just received the "Friendship Jar Holiday Fillers" stamp set in the mail this week and wanted to try it out.  You can see the stamp set on the Papertrey Ink website:  HERE.

Here are some pics of my card.  I took these at night in the best lighting I could provide but they will not be as good as if I had taken them during the day...but with my husband's health issues I am finding that it is best to post things when I have a moment rather than waiting until later and not posting my cards at all.  I am hoping to make another card using this technique because I embossed the candy canes 4 times and tried coloring them as shown in Lisa's wonderful video but I just kept messing them up....so I ended up coloring the inside of the candy canes only instead of the actual embossing as she showed.  I didn't choose a dark cardstock because I wanted something soft and feminine to give to my son's teacher for Christmas...my next card will be with dark cardstock and a different PTI image....not sure what yet.  I do like this technique and enjoyed trying it out.  Embossed images are so very elegant!


Thanks for taking a look at my card!  The holly leaves are made out of white craft foam I picked up at michael's.  The pink felt circle cut under the white button at the top was cut from the Love Lives Here die set.  I was trying to make a tab of some kind to fill in the top of the card a little because the bow I attempted at first was too big and I couldn't make it work.  The adorable sentiment and little candy stamp are from Candy Cane Christmas....I LOVE this set and seem to use it on all my cards lately!   Again - sorry about the picture quality....I am off to bed.   Just 3.5 more days until Winter break - I cannot wait!!!!
  :)  Jill

Tuesday, December 6, 2011

A Crafty Secrets Christmas card...

Hello All,
I had a chance to make 1 quick card last night and thought I would put a picture up really quick...

Crafty Secrets is hosting a glittery challenge over at splitcoast stampers.  I tried to upload my image but am not sure it took to be entered for the prize.  Oh well!  The joy is in the making of the cards anyway and I had so much fun making this one!

I am starting to work on some candy cane tags and have them part way finished...perhaps I will get to post them in the next couple days....my hubbie starts chemo tomorrow again so we shall see....if I disappear from blog land for a bit you will understand that I am just caring for my sweet family...happy crafting friends.  Thanks for all of your sweet comments and visits!
:)  Jill

Friday, December 2, 2011

A few Christmas Cards using vintage images...Dec 2011


I decided to switch it up tonight and make a few Christmas cards using some Crafty Secrets christmas images and/or a couple free old vintage images that I have saved to my hard drive. These are kind of different for me in that they have lots of little bits and bobs on them. Here are some pics:


I made a little snowflake embellishment - see next pic below - with two different punched snowflakes, a button, some liquid pearls and black floss.

This card (below) has a Crafty Secrets image for the focal point and some embossed trees (Tim Holtz embossing folder from last christmas) as well as some more handmade snowflake embellishments - these with some prima trim in their centers.  And of course a little bit of stickles added here and there to glitter things up a bit.

This next card has some Sizzix, MFT and PTI dies, a crafty secrets image and a pti stamped tag from the tiny tags set.  Also a few touches of velvet ribbon another must have Christmas embellishment to me!


That is it for me for tonight....I am off to put my little one to bed and do the last meds of the day for my husband.  Thanks for looking and or commenting.  Merry Christmas early!
:) Jill


Wednesday, November 30, 2011

Make it Monday #43 - Ribbon Pleating

Hello all,
Last night I had some time to make a card for the Make it Monday challenge over at Papertrey Ink.  Dawn McVey did a great video which you can see here:  http://nicholeheady.typepad.com/capture_the_moment/

I love all the cards that the Papertrey Design Team showcase on their blogs.  I decided to follow the basic design of Dawn's card for my take on this challenge and to use my current favorite dies the new damask snowflake dies from Papertrey ink.  I just love these....I love anything to do with snow and snowflakes!  And these dies are gorgeous alone or layered together.

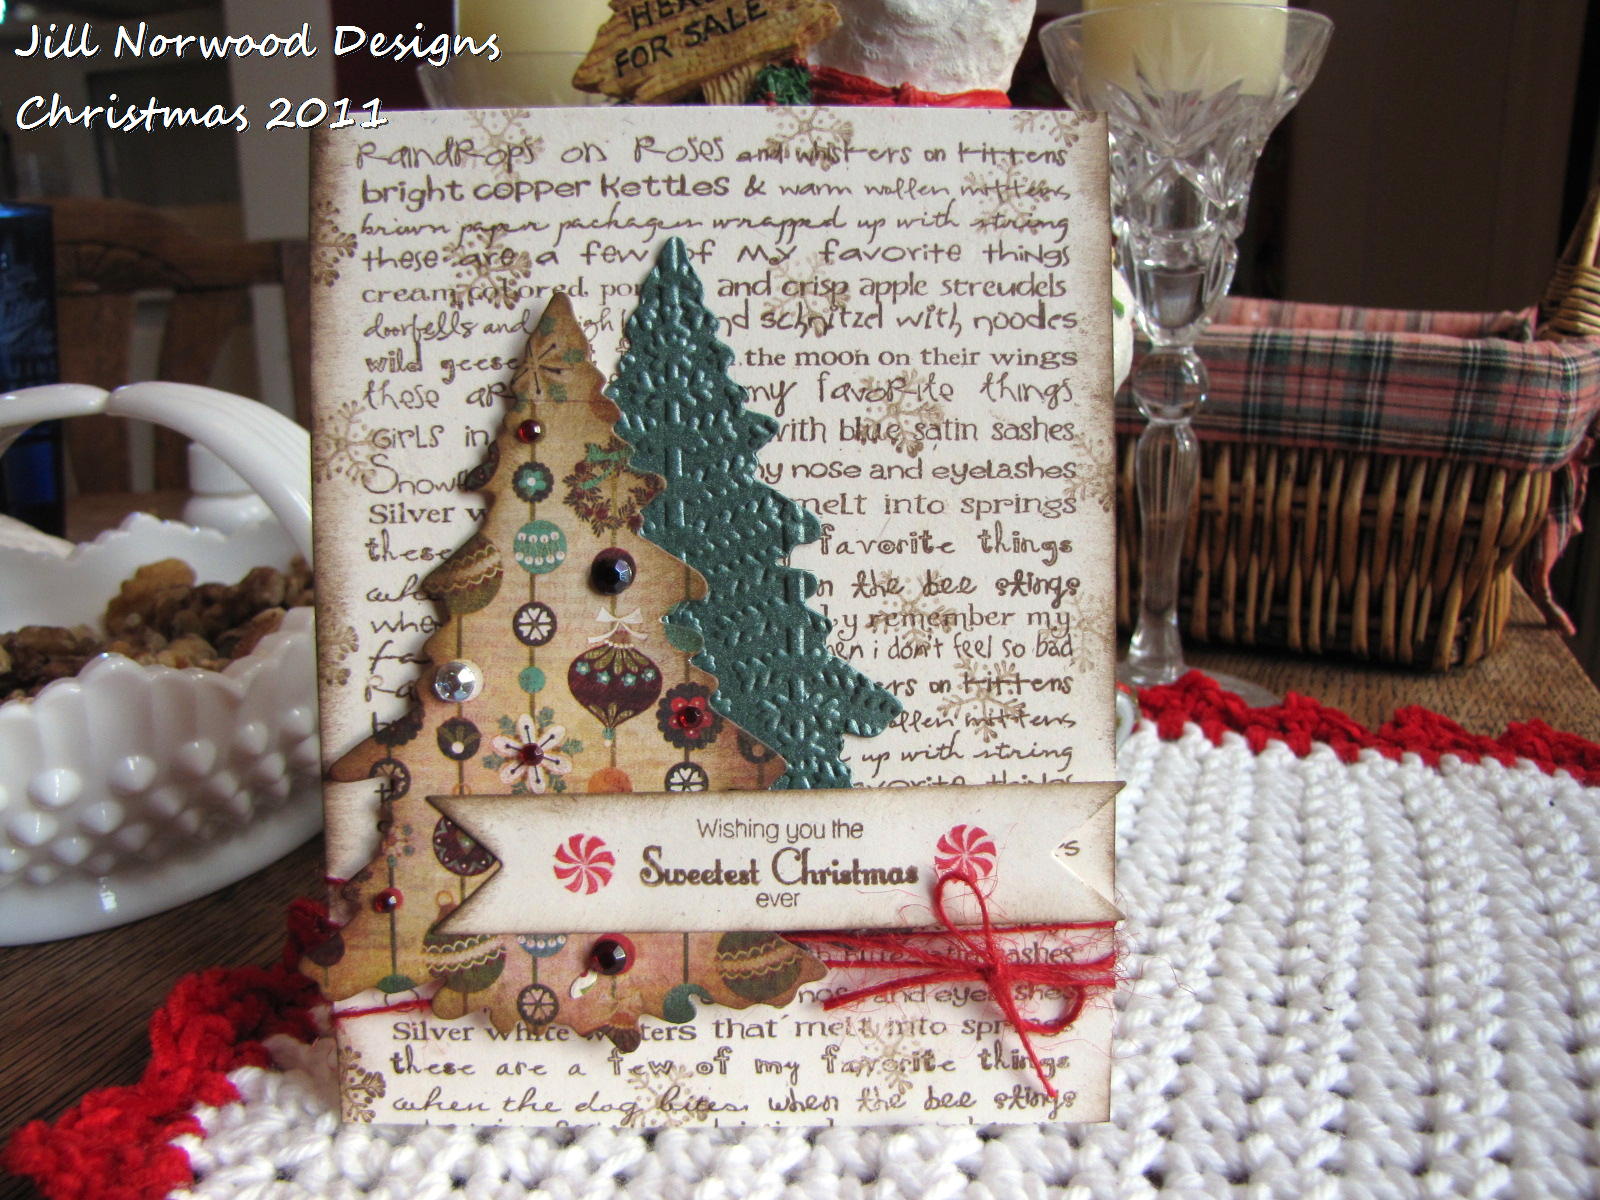
Here are some pictures of my card:
All the supplies, other than adhesive, twine, and tsukineko sheer shimmer spritz, and glitter (Martha Stewart coarse white) are from Papertrey Ink.  The red tape adhesive that I used did not hold the ribbon as well as I would have liked overnight.  Even with the extra strips of tape on the back side of the focal panel both of the cards that I attempted had loose ribbon the next morning.  The other card will have to be completely redone!  I will definitely try score tape on my next card - it seemed to have disappeared off of my desk and I was unable to use it last night - perhaps a little elf in my house has moved it to an unknown location? LOL! 

Here you can see the MS coarse white glitter that I added to the tips of the white snowflake and the smooch spritz!  I also edged the card in fresh snow ink to make it appear more wintry!

Here is my little tag of "warm wishes" that I tied through one of the openings in the snowflake with some turquoise divine twine.  I just love the tiny tags set and can't wait to receive the new holiday version.  My order should be here any time now!  I can't wait! 

Well that is it for today's card...thanks so much for taking a look.  I love seeing what everyone else creates and visiting everyone's blogs!  It is like a little surprise each time I click.  Isn't it amazing and beautiful how we each view the world so uniquely and our creations reflect that beauty back to each other and inspire all of us!   I just love that!
Happy Card Making!
:)  Jill 


Saturday, November 26, 2011

Make It Monday #42: Layered Background with Sentiment Stamps

This is my second card for Make it Monday #42 over at Nichole Heady's blog for Papertrey Ink.  This card started with PTI's new snowflake dies.  I wanted to make a card related to snow which is my very favorite thing about winter and something we don't see too often here in Seattle.  My little boy is especially fond of snow because he is always hoping for a "snow-day" so that he can stay home from school and build snowmen and go sledding!  Needless to say we haven't had any so far this year but it is only November 26th so there is still plenty of time.


I used PTI's Tag It's #8 and 2010 Holiday Tags to create the background and focal point on the snowflake.  I layered the snowflake with some aqua-mist cardstock to show thru the openings from the back and then layered a second snowflake at the back.  I used pure poppy and aqua mist ink for the background and tuxedo black ink for the focal stamp. 
I used the Papertrey Ink leafy vine border die to cut some white cardstock to create an icicle like border along the bottom of the card after using the large and medium scallop border dies to cover up the red/white gingham fabric tape.   I glittered everything up with some icicle  stickles to make this card extra sparkley for Christmas.  I added a twine wrap with a semi-pom-pom and a button to finish it all off.
One last photo - having a hard time getting a well-lit picture on this dreary Seattle day...
Thanks for taking a look!  Thanks to Linda from Australia who left such beautiful comments on my blog today - they cheered me and helped my crafting mojo!  Happy Crafting one and all!
:)  Jill